
Cluster Maintenance
Cluster Maintenance
1. Core Concepts
Before performing cluster maintenance operations, understand the IoTDB cluster architecture, series partitions, time partitions, and related concepts.
1.1 Glossary
| Term | Type | Description |
|---|---|---|
| ConfigNode | Node role | Management node. It manages cluster information, including partition records, load balancing, operation scheduling, and node management. |
| DataNode | Node role | Data node. It provides client read and write services, manages data and metadata, and participates in different replica groups. |
| Database | Metadata | A database. Data in different databases is physically isolated. |
| DeviceId | Device name | Tree model: the full path from root to the penultimate level represents a device name.Table model: the combination of values in all TAG columns of a table represents a device name. |
| SeriesSlot | Series partition slot | Each Database holds a fixed number of series slots, which contain metadata for the series assigned to them. |
| TimeSlot | Time partition slot of a series slot | Time-series data in each SeriesSlot is divided into multiple TimeSlots. Each TimeSlot manages the data of all devices in that SeriesSlot for a period of time. |
| DataPartition | Data partition slot | A DataPartition is formed by the two-dimensional intersection of a SeriesPartitionSlot and a TimePartitionSlot. It is created on demand when data exists and is the core storage unit that actually holds data. |
| SchemaRegion | Metadata engine (replica) | The metadata management engine on a DataNode. It manages a collection of SeriesSlots and provides metadata read and write operations. |
| DataRegion | Data engine (replica) | The data management engine on a DataNode. It manages a collection of DataPartitions and provides data read and write operations. |
| ConfigNodeGroup | Logical concept (consensus group) | Composed of all ConfigNode nodes in the cluster. It maintains consistent partition table information through a consensus protocol. |
| SchemaRegionGroup | Logical concept (consensus group) | Metadata replica group. It contains several SchemaRegions according to the metadata replica factor, manages the same metadata, and provides backups for each other. |
| DataRegionGroup | Logical concept (consensus group) | Data replica group. It contains several DataRegions according to the data replica factor, manages the same data, and provides backups for each other. It is the basic unit of IoTDB cluster throughput. |
1.2 Cluster Architecture
An IoTDB cluster consists of management nodes (ConfigNodes) and data nodes (DataNodes), and uses an MPP architecture for large-scale parallel processing. Its core characteristics are device-level partitioning for metadata and two-dimensional partitioning by device and time for data, which ensures comprehensive scalability.
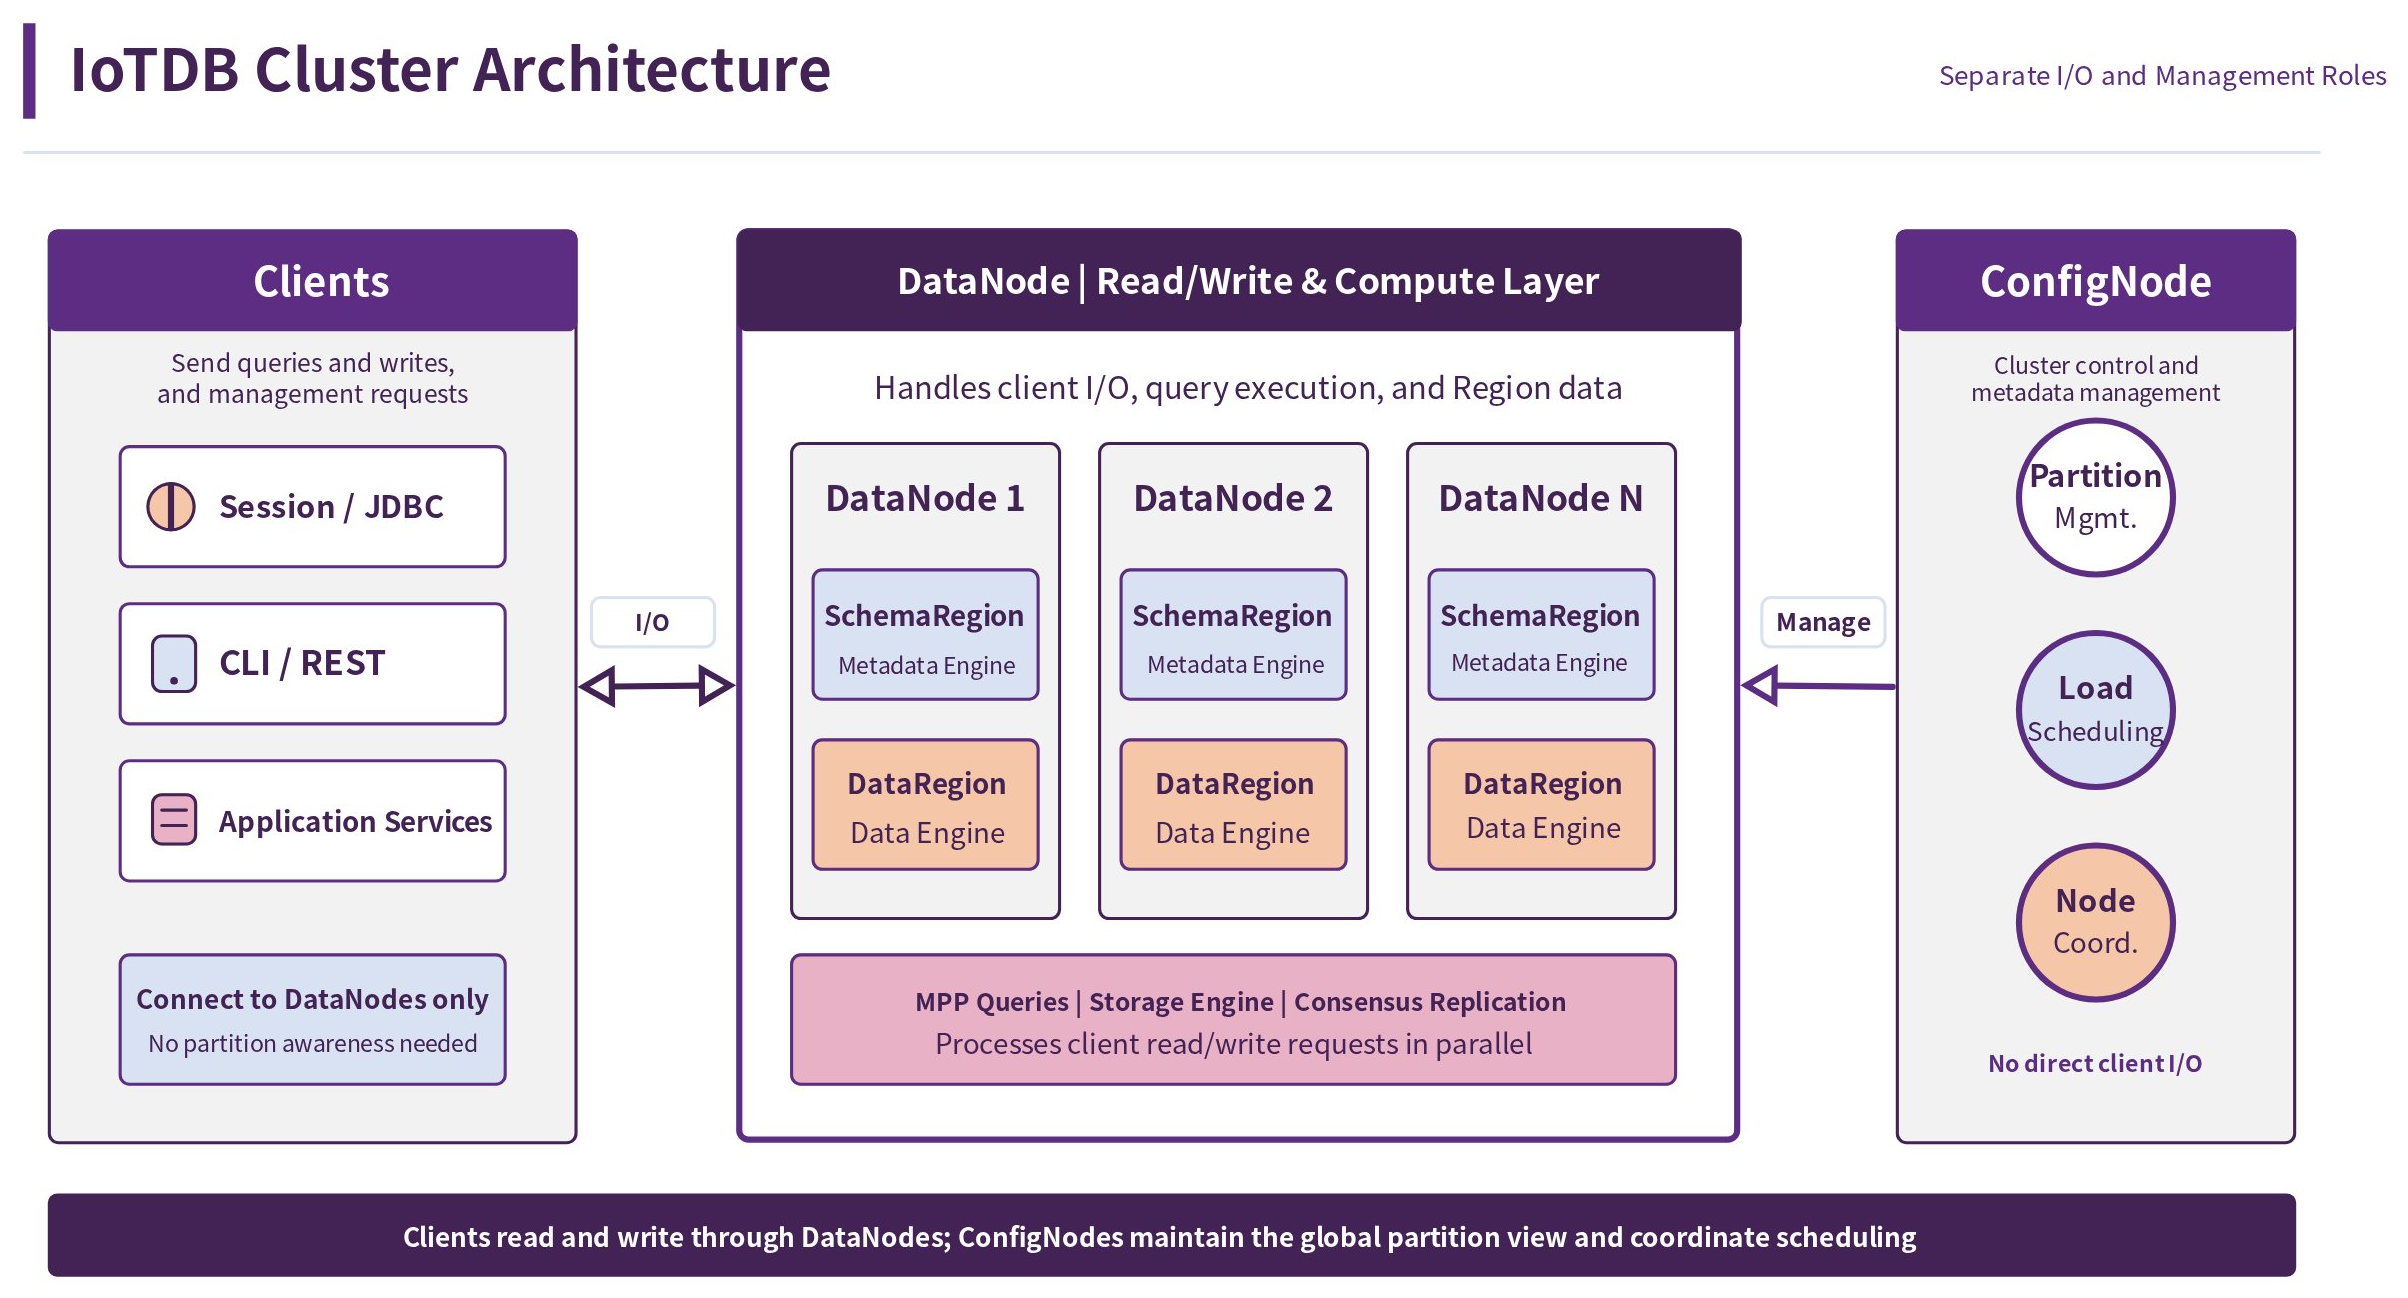
1.3 Partition Management
1.3.1 Cluster Consensus Groups
In IoTDB, DataRegionGroups and SchemaRegionGroups are the smallest units for read/write workloads. Data consistency is guaranteed through the consensus group mechanism. Therefore, the essence of cluster scaling is to add data partitions to improve concurrency and throughput.
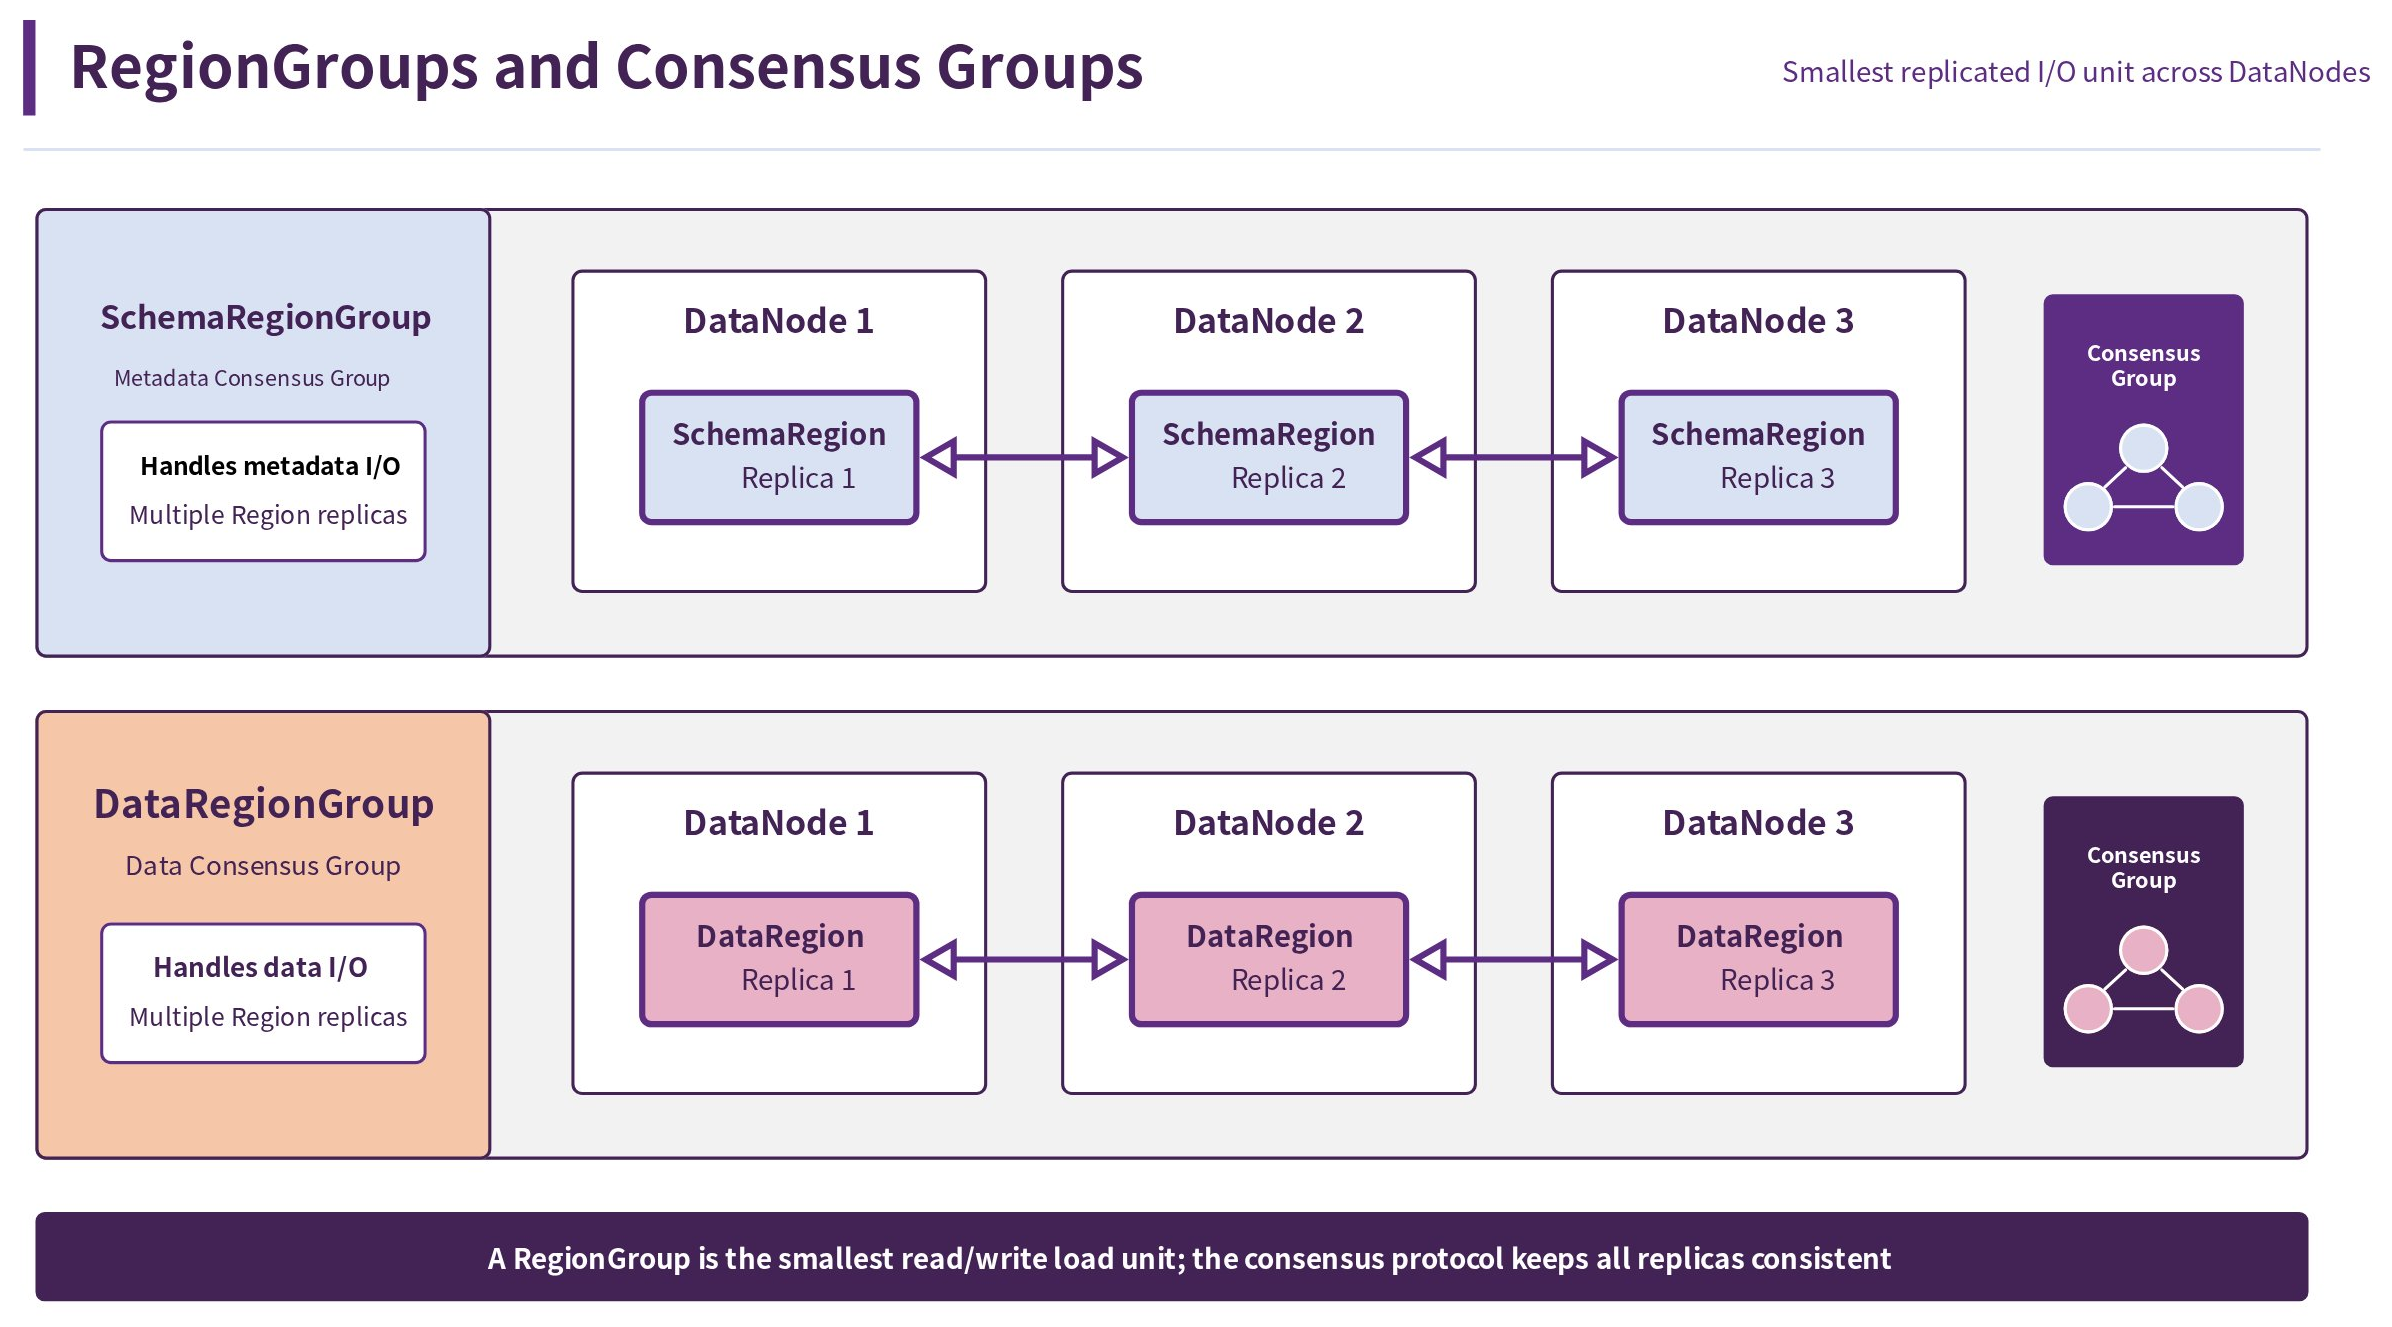
1.3.2 Partition Slot Mechanism
For partitioning and load scheduling, IoTDB introduces two core slot mechanisms to support scaling and efficient distributed management.
The first is SeriesPartitionSlot, which vertically manages time series. Each database holds a fixed number of series partition slots (1000 by default). Each time series is assigned to a unique series partition slot by the series partitioning algorithm. Using series partition slots avoids directly recording partition information at the device or time-series level, significantly reducing ConfigNode memory overhead.
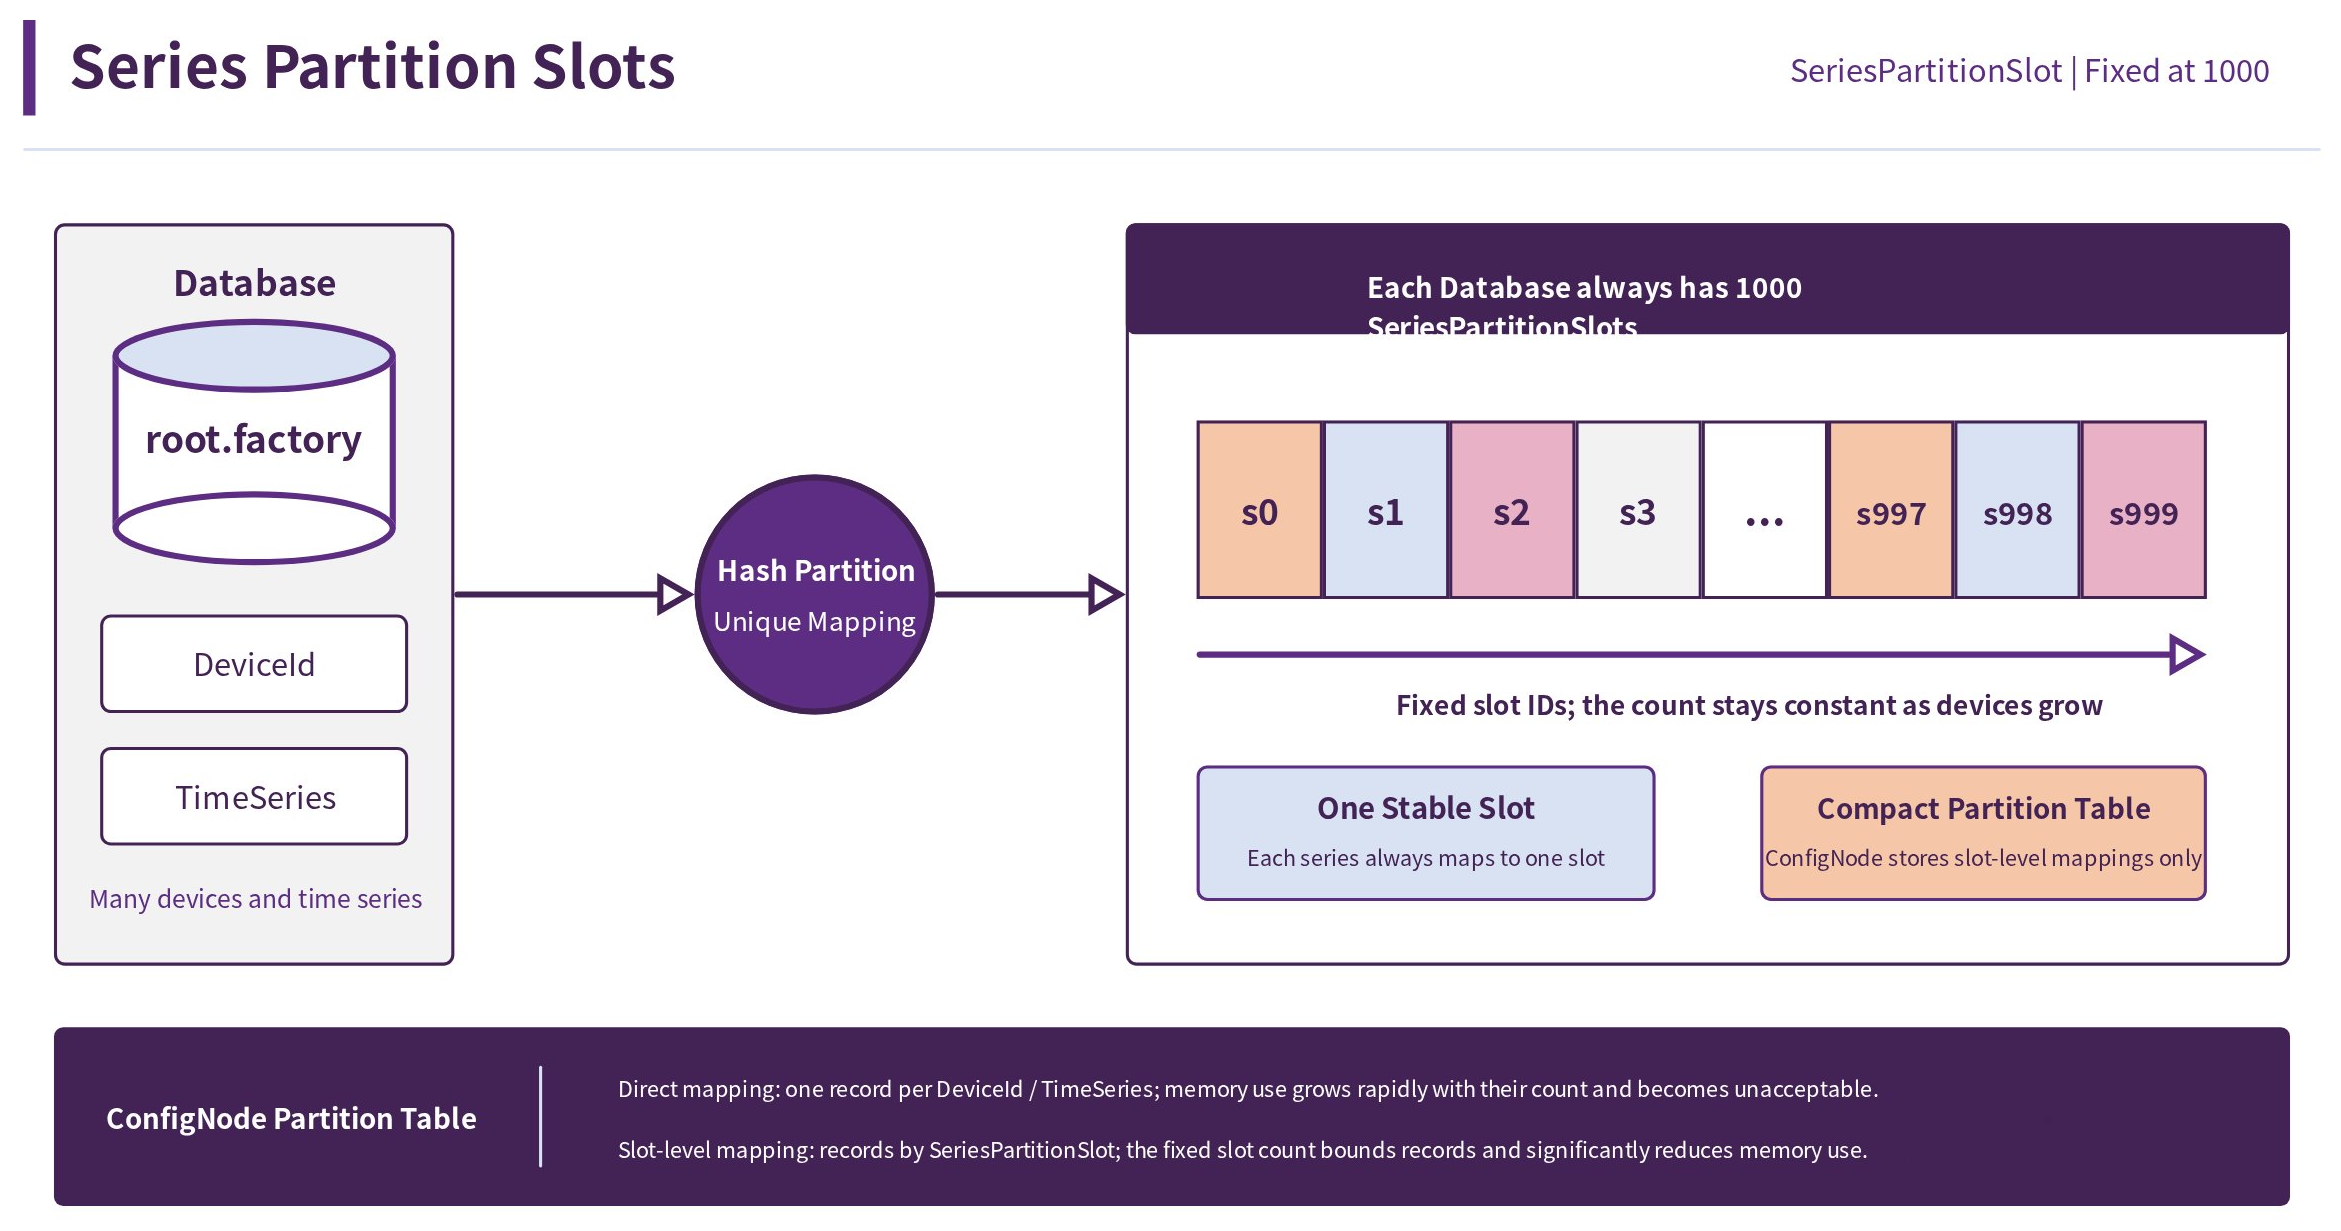
The second is TimePartitionSlot, which horizontally splits time-series data. Each data partition is composed of one series partition slot and one time partition slot. When data exists in a specific time partition slot under a series partition slot, the corresponding data partition is generated.
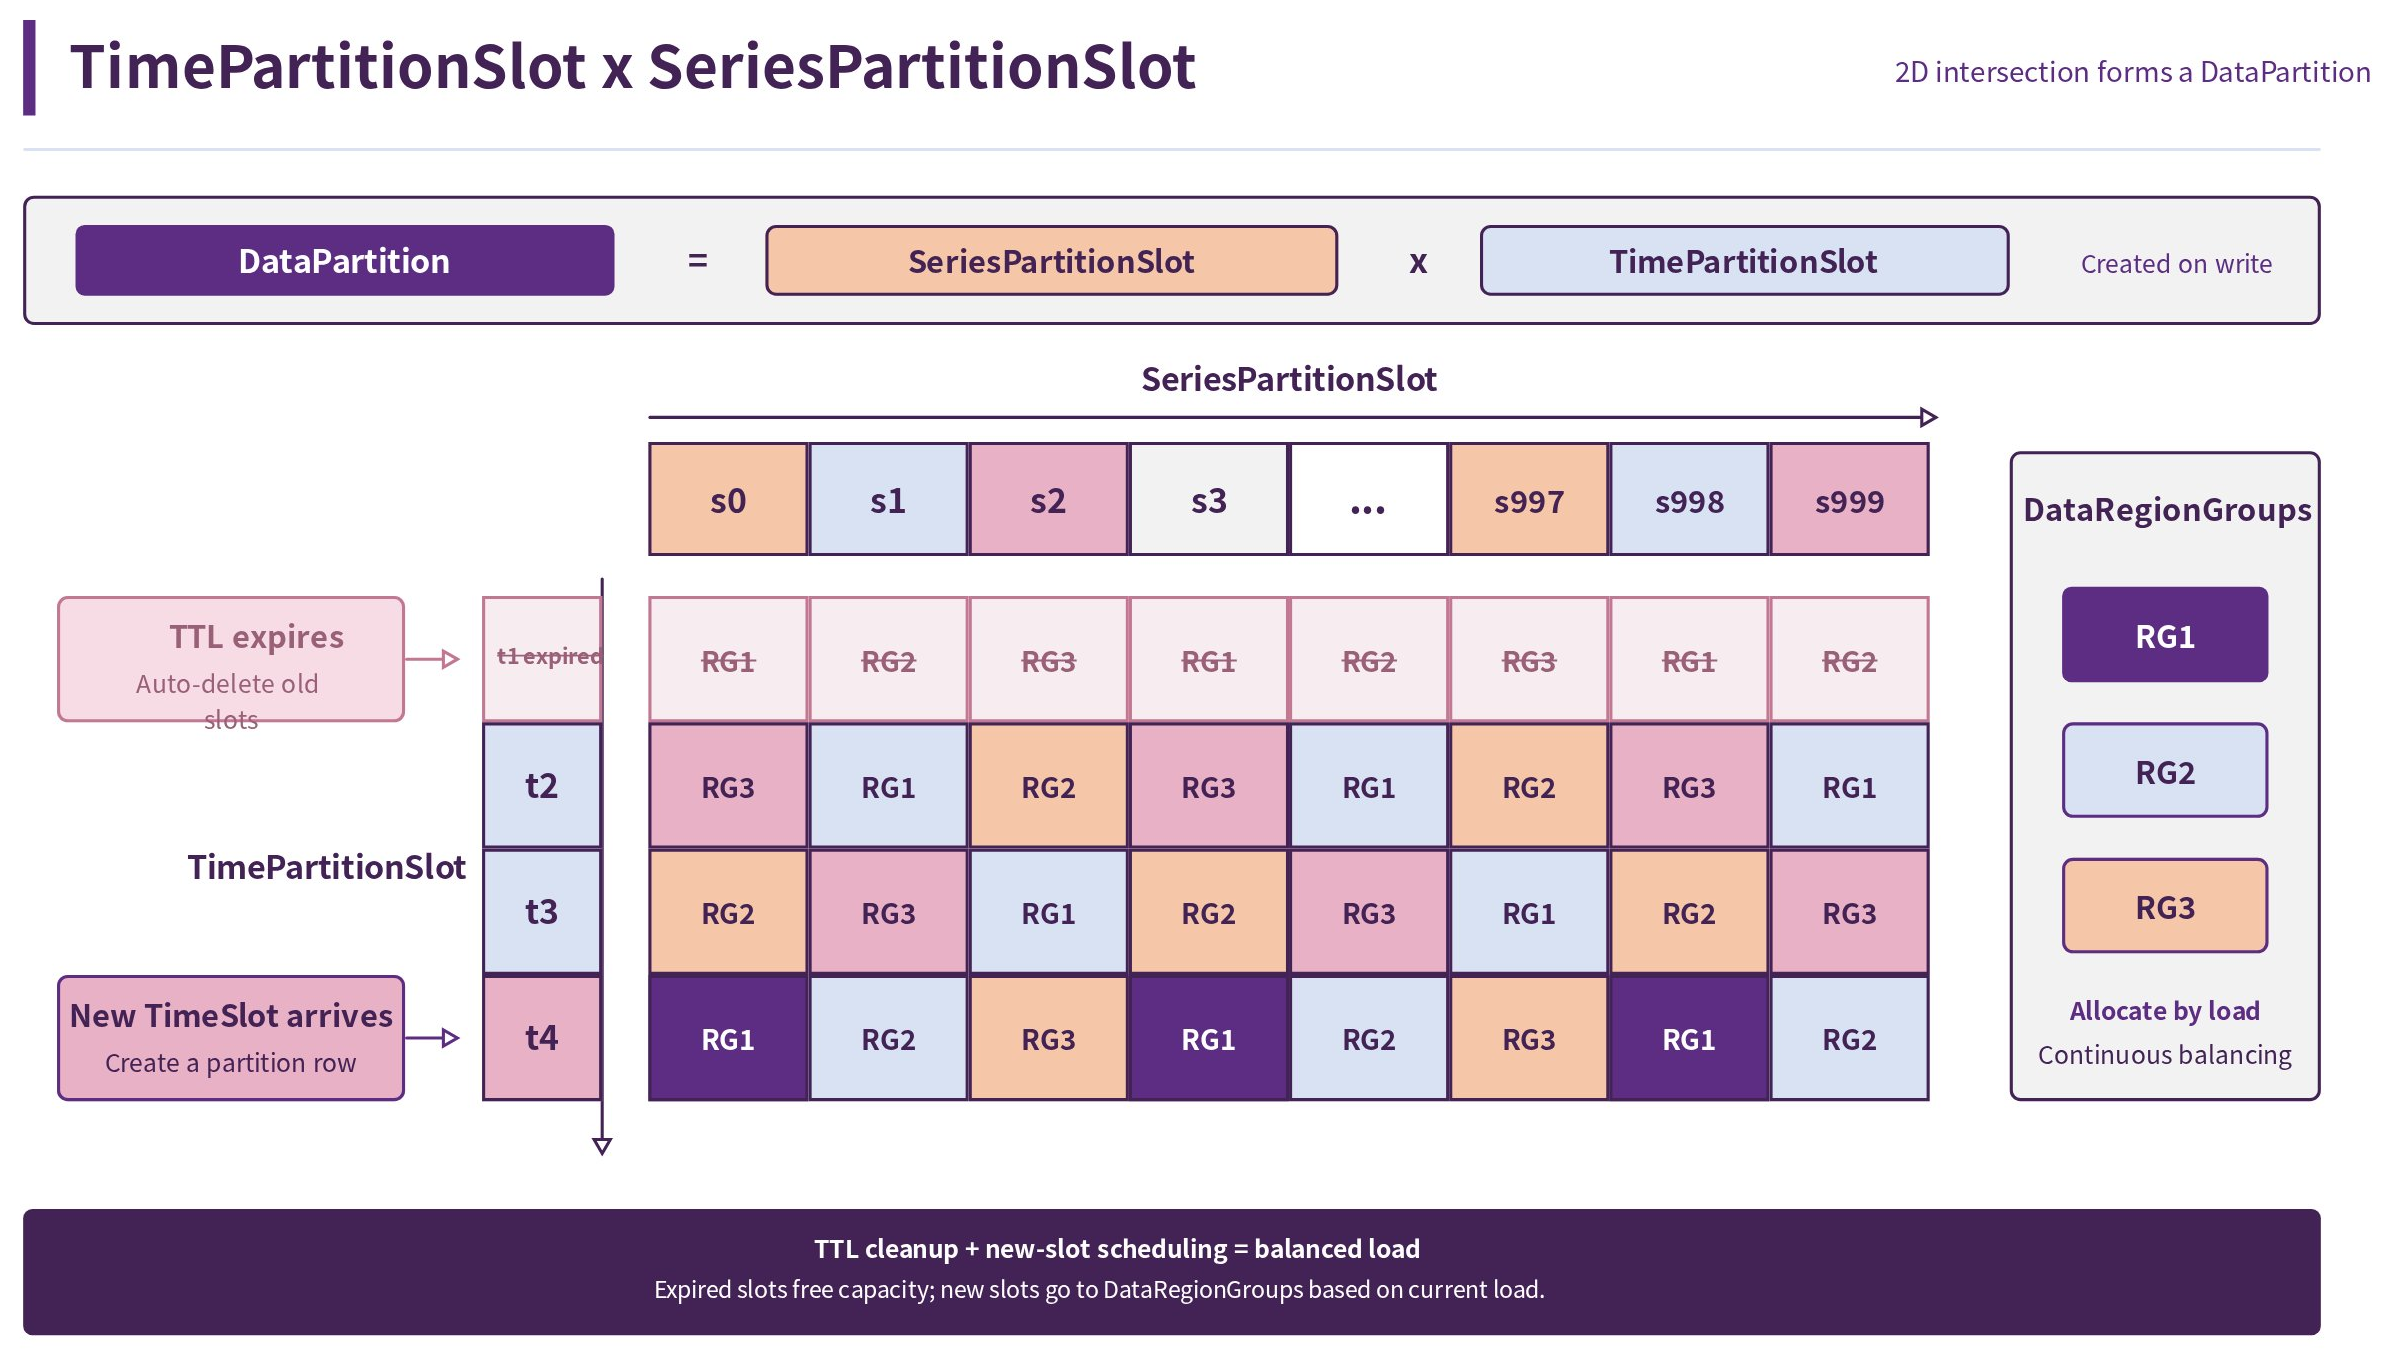
Through the combination of series partition slots and time partition slots, IoTDB can flexibly add data partition groups during scaling, achieving balanced data distribution and efficient reads and writes, thereby improving cluster throughput and scalability.
2. Cluster Scaling
When an IoTDB cluster encounters CPU, memory, disk, network, or other resource bottlenecks due to surging data volume or access pressure, use this guide for horizontal scaling to improve overall cluster performance and capacity.
2.1 Implementation Principles
The core of IoTDB cluster scaling is adding DataNode nodes, because DataNodes are the main nodes that process read and write requests. Their internal data partitions (DataRegions) are key workload units. Scaling essentially improves cluster concurrency and throughput by adding data partition groups.
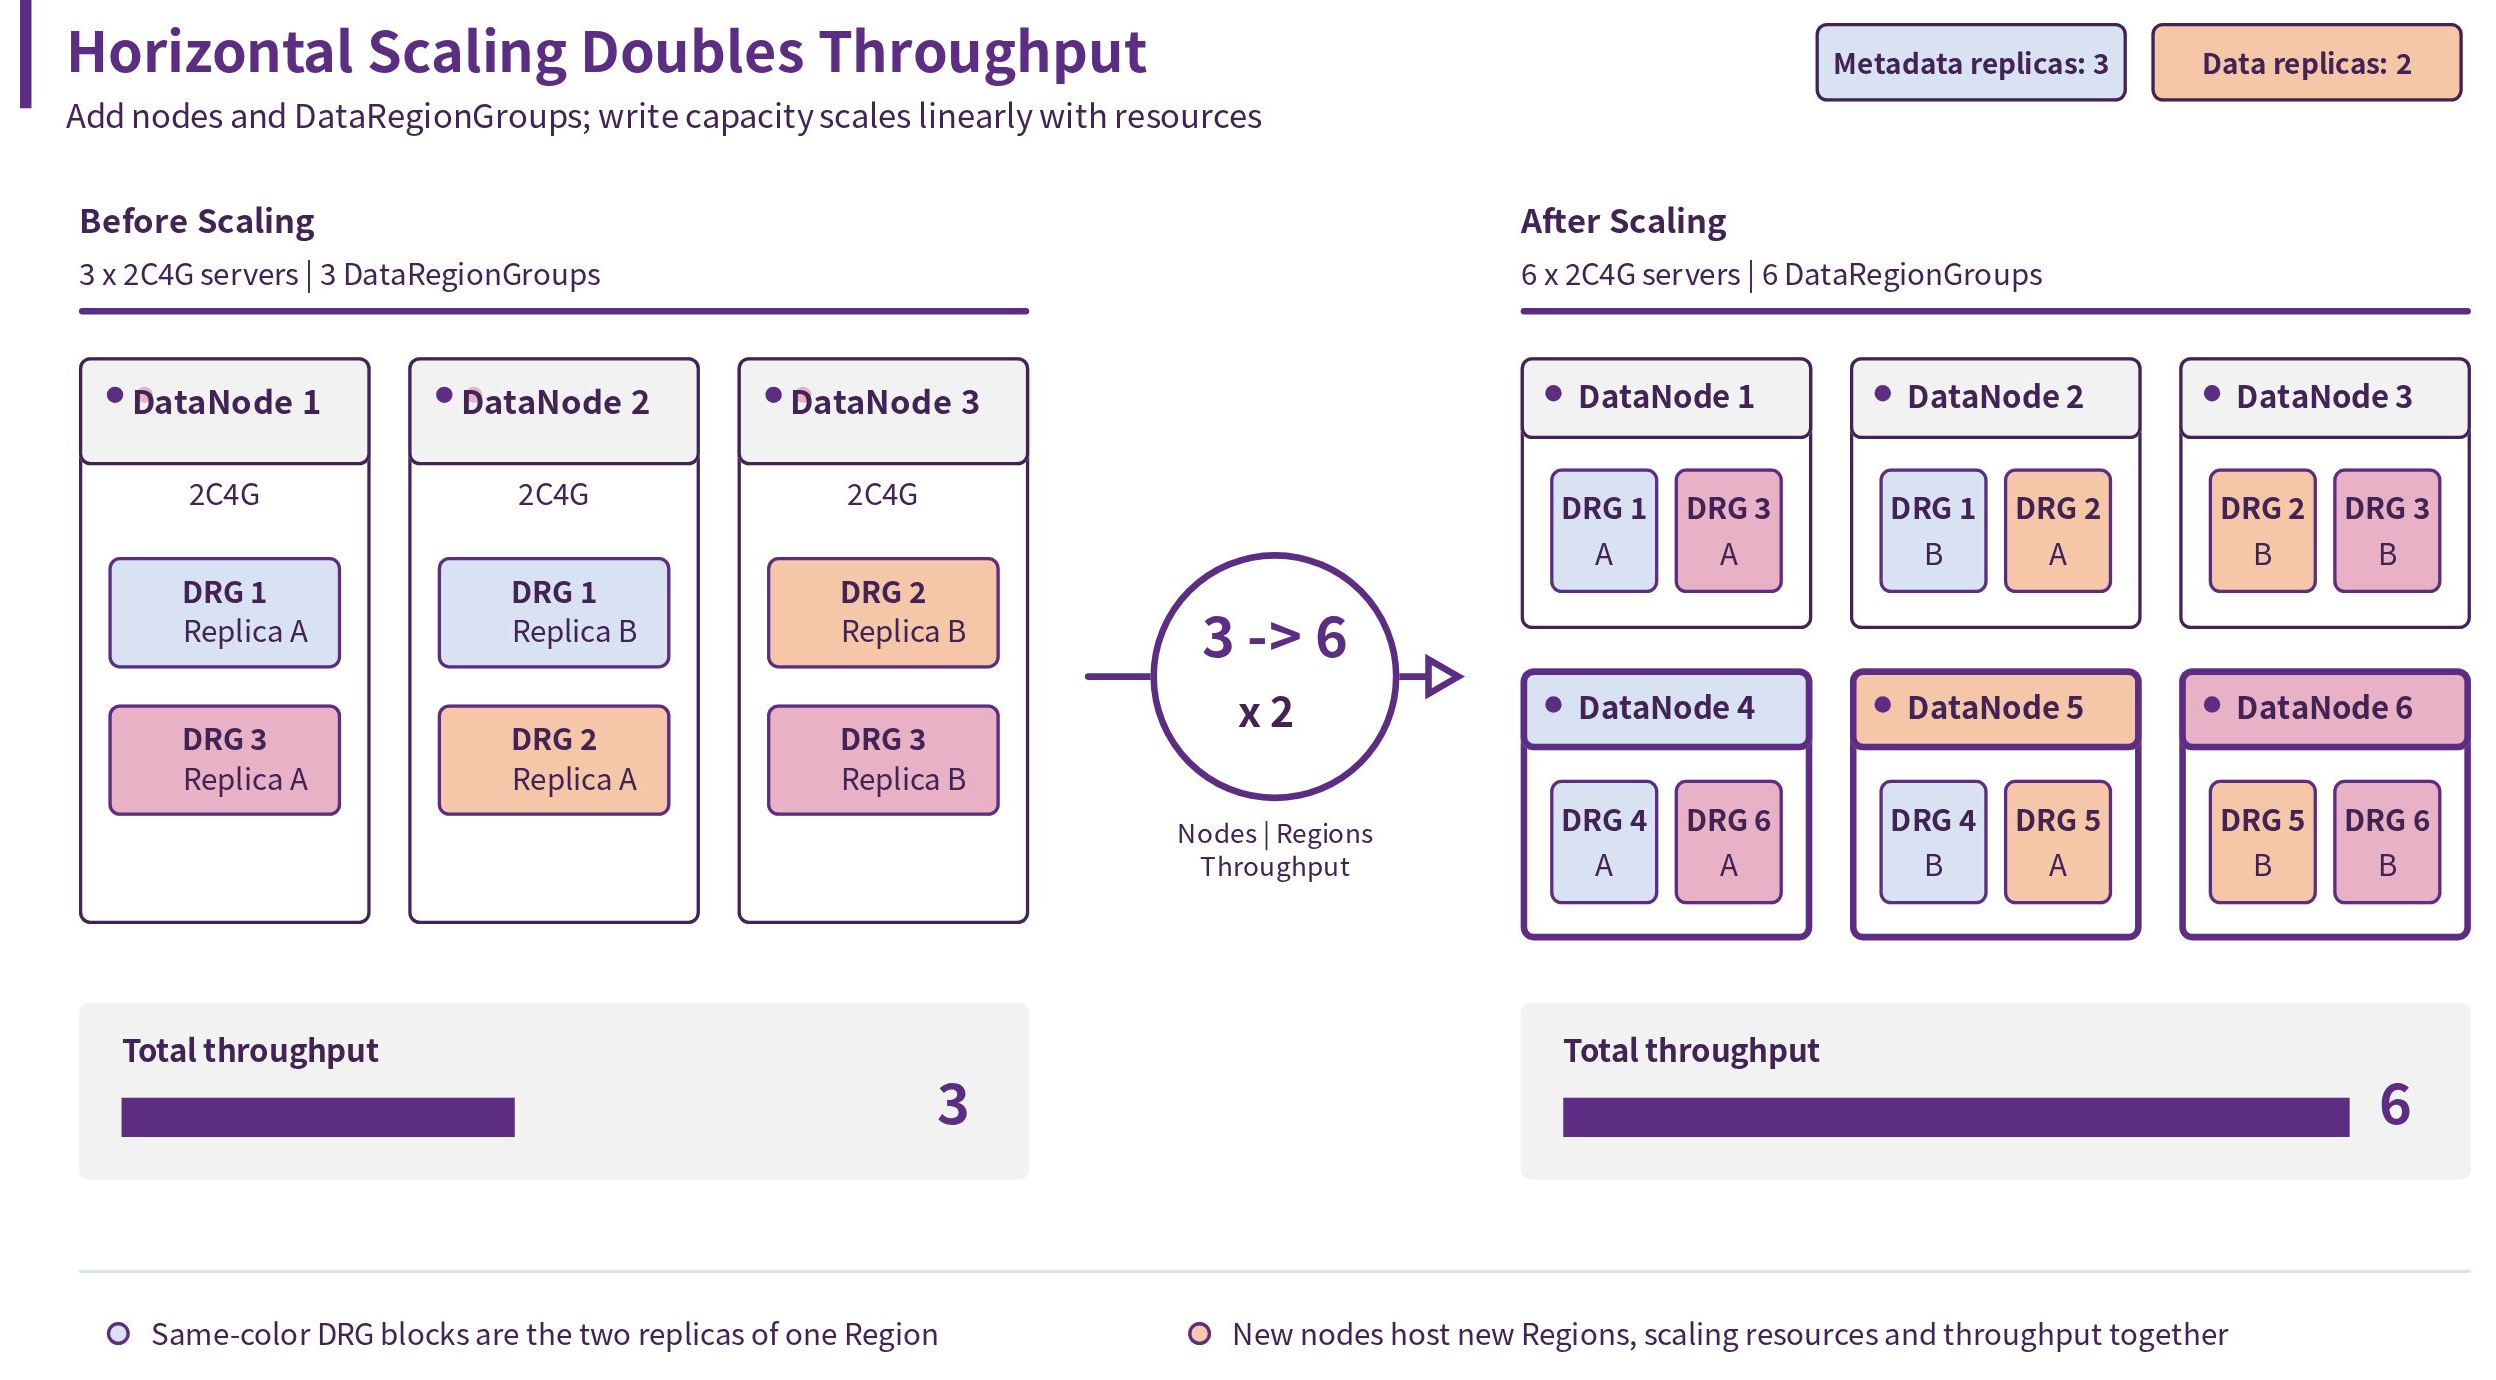
By default, assume that the metadata replica factor is three and the data replica factor is two. During initial initialization, the cluster creates data partitions equal to the total number of cluster cores divided by two. In the following figure, a cluster consists of three 2-core servers. If the processing capacity of each data replica group is 1, the total throughput capacity of the cluster, which contains three data replica groups, is 3. Therefore, when the number of servers is expanded from three to six, the cluster expands from three data partition groups to six data partition groups, and the total throughput capacity doubles accordingly.
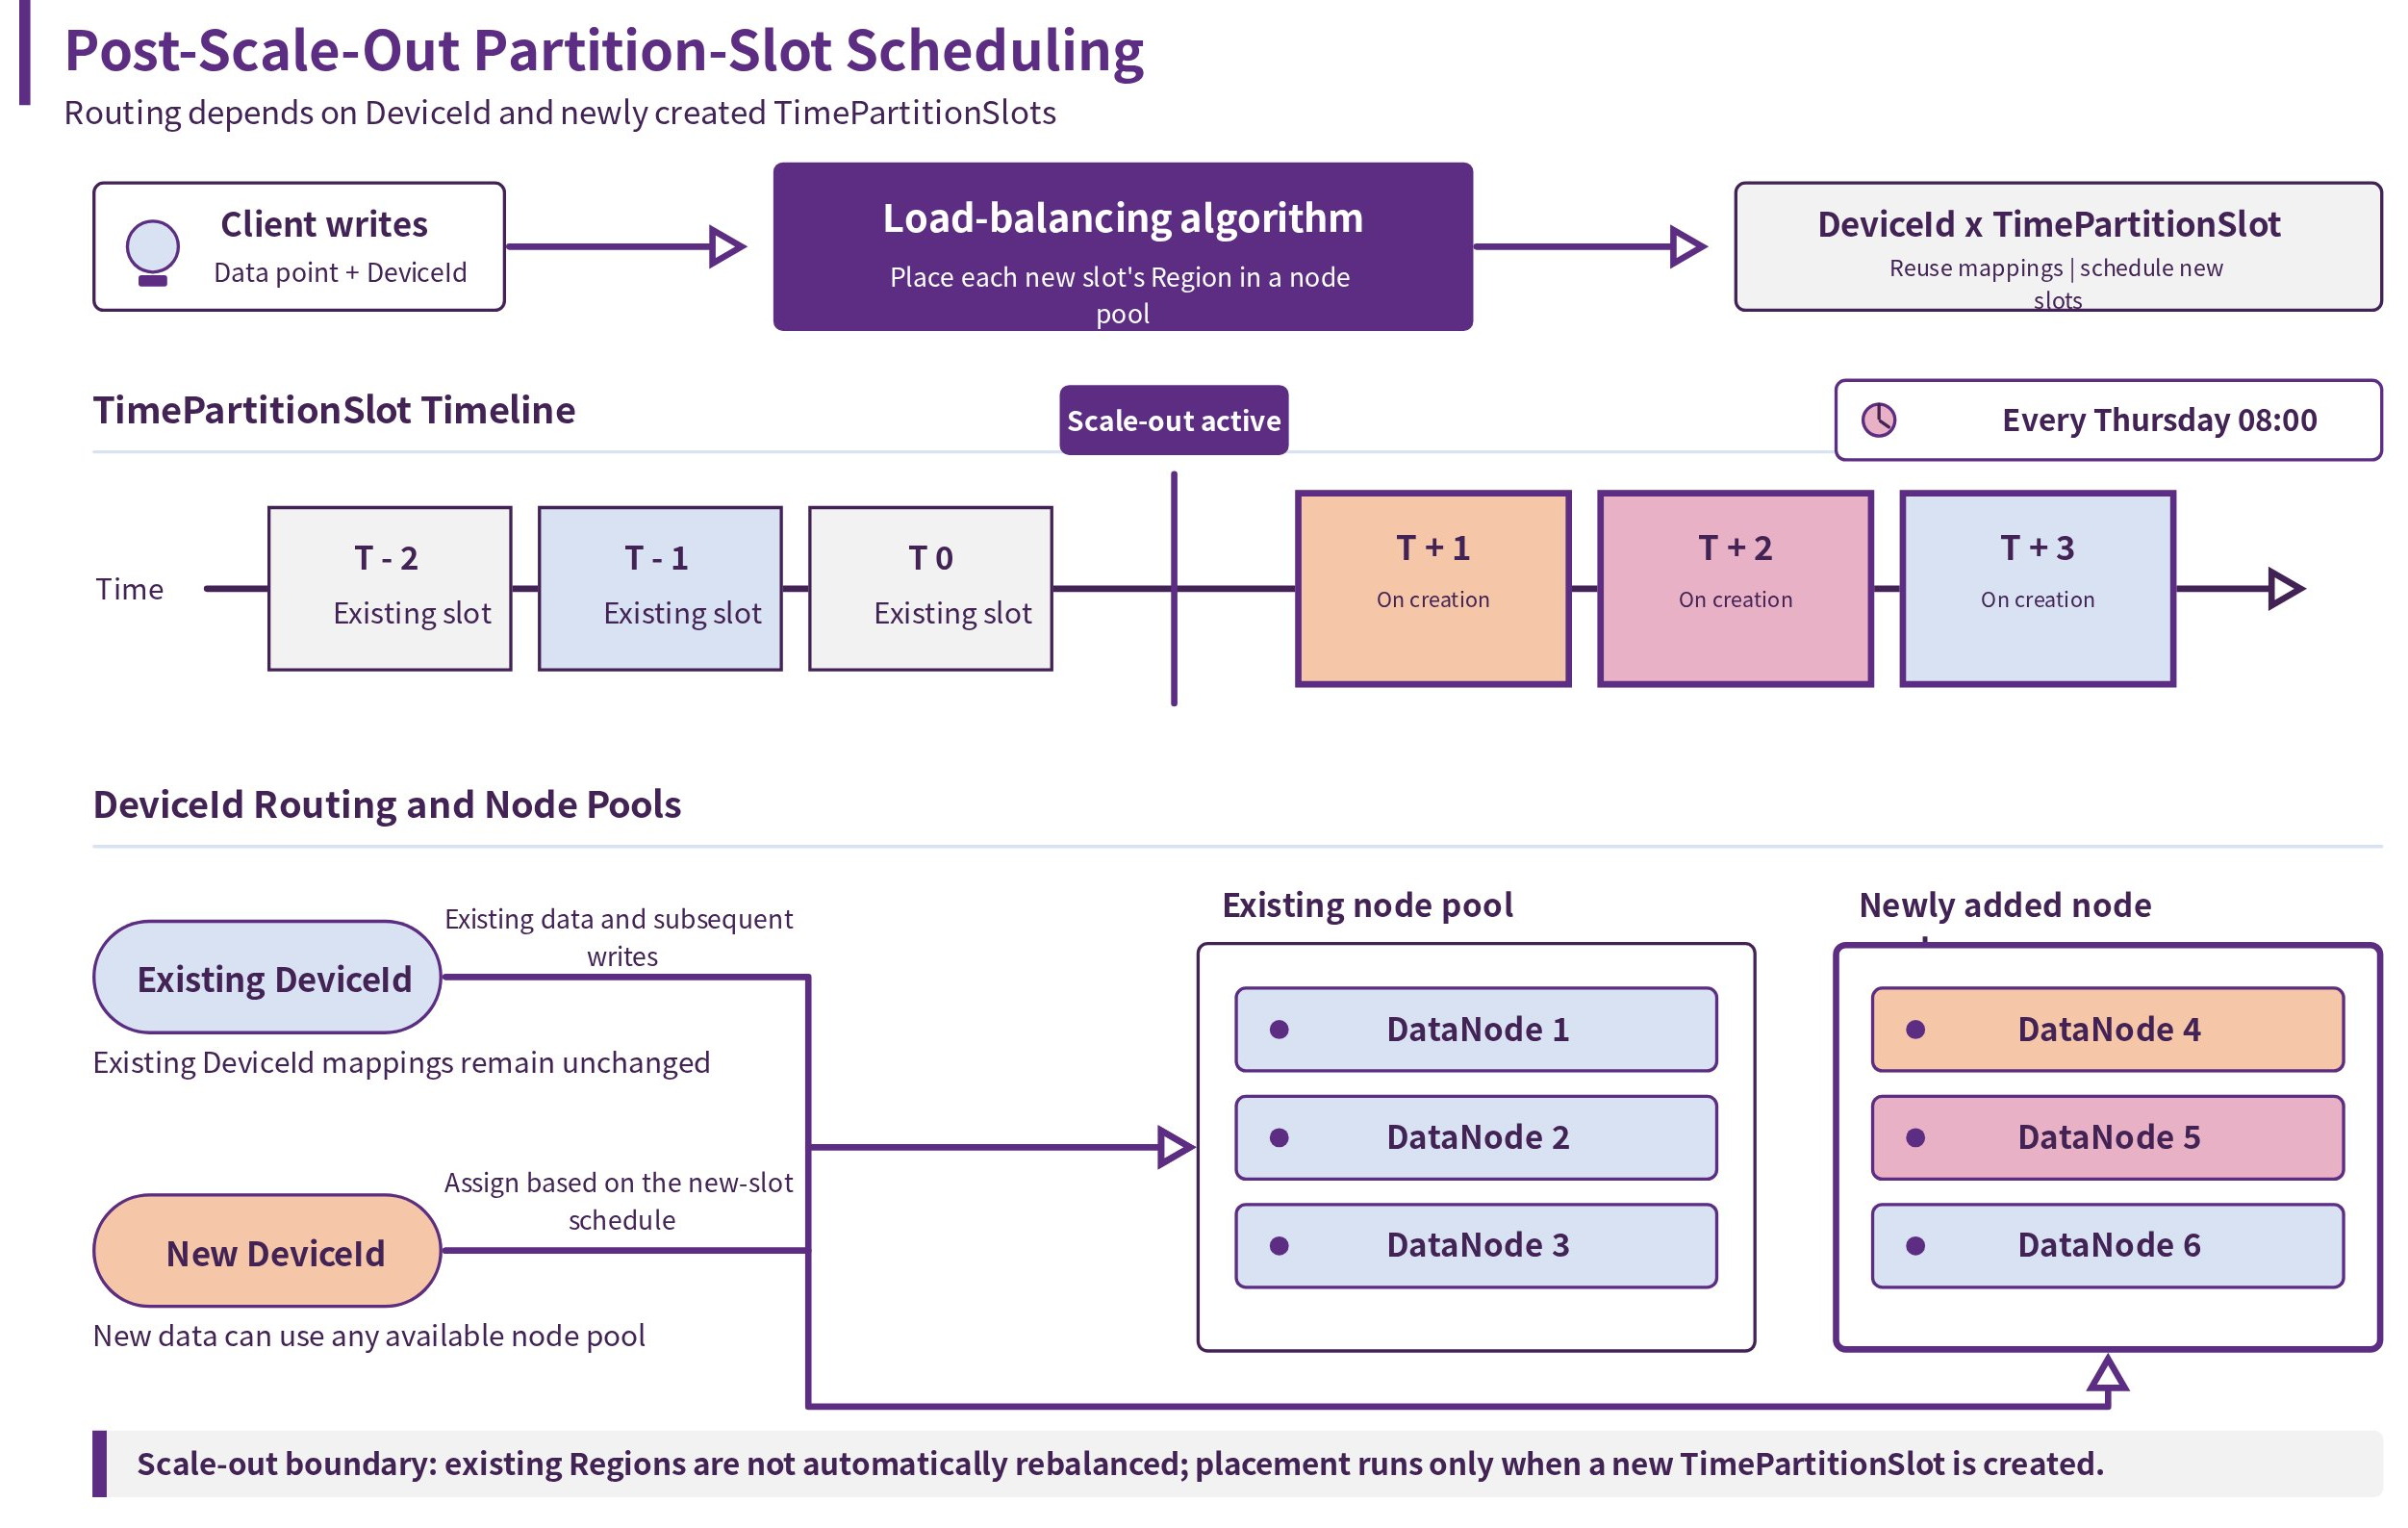
After scaling, the client read/write load balancing rule is as follows: old nodes may process reads and writes for both old devices, whose DeviceIds already exist in the cluster, and new devices, whose DeviceIds do not yet exist in the cluster. New nodes only receive reads and writes for newly added data. Old nodes do not automatically rebalance existing replica groups. Data load balancing is usually performed whenever a new time partition is created. The default time is 8:00 every Thursday morning. The core principle is to run the load balancing algorithm based on series partition slots and time partition slots, thereby determining which node and which partition should process the data.
If you want to further balance historical data after scaling, you can perform Region migration or Region rebalancing as needed. When you need to precisely specify the Region, source DataNode, and target DataNode, see 4. Manual Region Migration. When you want the system to automatically calculate a migration plan and complete overall balancing, see 5. Automatic Region Rebalancing.
2.2 Procedure
2.2.1 Preparation
Check the server environment. It is recommended that the operating system version be consistent with the original cluster.
Check the database version. It is recommended that the version be consistent with the original cluster version.
Check the operating system environment to ensure that required ports are not occupied. DataNode uses ports 6667, 10730, 10740, 10750, 10760, 9090, 9190, and 3000. Make sure these ports are not occupied.
# If the command has output, the port is already occupied.
lsof -i:6667  or  netstat -tunp | grep 6667
lsof -i:10710  or  netstat -tunp | grep 10710
lsof -i:10720  or  netstat -tunp | grep 10720
Check the data directory. Confirm that the server has mounted a data disk. It is recommended to place the installation package under the data disk directory.
Software dependency: install a Java runtime environment. Java version must be >= 1.8. Make sure JDK environment variables are configured.
Domain name configuration: during deployment, it is recommended to use hostnames for IP configuration first, which can avoid database startup failures caused by host IP changes later. To set a hostname, configure
/etc/hostson the target server. If the local IP is192.168.1.3and the hostname isiotdb-1, use the following command to set the server hostname and use the hostname to configure IoTDBcn_internal_address,dn_internal_address, anddn_rpc_address.
# Note: hostnames of both this machine and the original cluster nodes must be configured.
echo "192.168.1.3  iotdb-1" >> /etc/hosts
2.2.2 Scaling Operations
- To ensure that the IoTDB installation package you obtained is complete and correct, perform SHA512 verification before installation and deployment.
- Extract the installation package and enter the installation directory.
unzip  iotdb-{version}-bin.zip
cd iotdb-{version}-bin- Modify the corresponding configuration.
cd  iotdb-{version}-bin/conf
vim iotdb-system.properies| Configuration item | Description | Default | Remarks |
|---|---|---|---|
| dn_seed_config_node | The ConfigNode address that the node connects to when registering and joining the cluster, namely cn_internal_address:cn_internal_port | 127.0.0.1:10710 | Very important. This item must be changed to the address of the primary ConfigNode in the original cluster. |
| dn_rpc_address | Address of the client RPC service | 0.0.0.0 | Modify as needed. Takes effect after service restart. |
| dn_rpc_port | Port of the client RPC service | 6667 | Modify as needed. Takes effect after service restart. |
| dn_internal_address | Address used by the DataNode for intra-cluster communication | 127.0.0.1 | Modify as needed. Cannot be changed after the first startup. |
| dn_internal_port | Port used by the DataNode for intra-cluster communication | 10730 | Modify as needed. Cannot be changed after the first startup. |
| dn_mpp_data_exchange_port | Port used by the DataNode to receive data streams | 10740 | Modify as needed. Cannot be changed after the first startup. |
| dn_data_region_consensus_port | Port used by the DataNode for data replica consensus protocol communication | 10750 | Modify as needed. Cannot be changed after the first startup. |
| dn_schema_region_consensus_port | Port used by the DataNode for metadata replica consensus protocol communication | 10760 | Modify as needed. Cannot be changed after the first startup. |
- Start the DataNode.
Enter the IoTDB sbin directory and start the DataNode:
./sbin/start-datanode.sh -d # The "-d" parameter starts the process in the background.- Connect to the original cluster through the CLI for post-scaling verification.
# Linux or macOS
  ./iotdb-{version}-bin/sbin/start-cli.sh

  # Windows
./iotdb-{version}-bin/sbin/start-cli.bat- Execute the verification command.
Run show datanodes for verification. The expected result is that the newly added node appears in the list and its status is Running.
IoTDB> show datanodes
+------+-------+----------+-------+-------------+---------------+
|NodeID| Status|RpcAddress|RpcPort|DataRegionNum|SchemaRegionNum|
+------+-------+----------+-------+-------------+---------------+
|     1|Running|   0.0.0.0|   6667|            0|              0|
|     2|Running|   0.0.0.0|   6668|            1|              1|
|     3|Running|   0.0.0.0|   6669|            1|              0|
|     4|Running|   0.0.0.0|   6669|            1|              0| # Newly added node
+------+-------+----------+-------+-------------+---------------+
Total line number = 4
It costs 0.110s- Repeat the above operations for other nodes. A new node can successfully join the original cluster only if the original cluster allows a sufficient number of DataNode nodes to join. Otherwise, contact the staff to reapply for activation code information.
2.2.3 Manual Load Balancing (Optional)
By default, historical data is not automatically migrated after scaling. If you need to further balance data distribution across nodes, choose one of the following methods:
- Manual Region migration: applies when the Region, source DataNode, and target DataNode to be migrated have been clearly identified. For details, see 4. Manual Region Migration.
- Automatic Region rebalancing: applies when you want the system to automatically select a migration plan after scaling and balance historical data overall. For details, see 5. Automatic Region Rebalancing.
3. Node Management
Node management is mainly used to remove and add ConfigNodes and DataNodes in the cluster. It is a basic operations and maintenance task for ensuring high cluster availability and achieving load balancing.
3.1 ConfigNode Maintenance
ConfigNode maintenance includes two operations: adding and removing ConfigNodes. There are two common use cases:
- Cluster expansion: if the cluster has only one ConfigNode and you want to improve ConfigNode high availability, add two ConfigNodes so that the cluster has three ConfigNodes.
- Cluster fault recovery: if the machine where one ConfigNode resides fails and the ConfigNode cannot run properly, remove the ConfigNode and then add a new ConfigNode to the cluster.
❗️ Note: After ConfigNode maintenance is completed, make sure the cluster has either 1 or 3 normally running ConfigNodes. Two ConfigNodes do not provide high availability, and more than three ConfigNodes cause performance loss.
3.1.1 Adding a ConfigNode
Script command:
# Linux / macOS
# First switch to the IoTDB root directory
sbin/start-confignode.sh

# Windows
# First switch to the IoTDB root directory
# Before V2.0.4.x
sbin\start-confignode.bat

# V2.0.4.x and later
sbin\windows\start-confignode.bat
Parameter description:
| Parameter | Description | Required |
|---|---|---|
| -v | Displays version information | No |
| -f | Runs the script in the foreground instead of putting it in the background | No |
| -d | Starts in daemon mode, that is, runs in the background | No |
| -p | Specifies a file to store the process ID for process management | No |
| -c | Specifies the path of the configuration folder from which the script loads configuration files | No |
| -g | Prints detailed garbage collection (GC) information | No |
| -H | Specifies the path of the Java heap dump file, used when JVM memory overflows | No |
| -E | Specifies the path of the JVM error log file | No |
| -D | Defines a system property in the format key=value | No |
| -X | Directly passes \-XX parameters to the JVM | No |
| -h | Help command | No |
3.1.2 Removing a ConfigNode
First connect to the cluster through the CLI and use show confignodes to confirm the NodeID of the ConfigNode to be removed:
IoTDB> show confignodes
+------+-------+---------------+------------+--------+
|NodeID| Status|InternalAddress|InternalPort|    Role|
+------+-------+---------------+------------+--------+
|     0|Running|      127.0.0.1|       10710|  Leader|
|     1|Running|      127.0.0.1|       10711|Follower|
|     2|Running|      127.0.0.1|       10712|Follower|
+------+-------+---------------+------------+--------+
Total line number = 3
It costs 0.030s
Then use SQL to remove the ConfigNode:
remove confignode [confignode_id]3.2 DataNode Maintenance
DataNode maintenance has two common use cases:
- Cluster scaling: add new DataNodes to the cluster to expand cluster capacity.
- Cluster fault recovery: if the machine where a DataNode resides fails and the DataNode cannot run properly, remove the DataNode and add a new DataNode to the cluster.
❗️ Note: To keep the cluster working properly, during and after DataNode maintenance, the total number of normally running DataNodes must not be less than the data replica factor, usually 2, nor less than the metadata replica factor, usually 3.
3.2.1 Adding a DataNode
Script command:
# Linux / macOS
# First switch to the IoTDB root directory
sbin/start-datanode.sh

# Windows
# First switch to the IoTDB root directory
# Before V2.0.4.x
sbin\start-datanode.bat

# V2.0.4.x and later
tools\windows\start-datanode.bat
Parameter description:
| Abbreviation | Description | Required |
|---|---|---|
| -v | Displays version information | No |
| -f | Runs the script in the foreground instead of putting it in the background | No |
| -d | Starts in daemon mode, that is, runs in the background | No |
| -p | Specifies a file to store the process ID for process management | No |
| -c | Specifies the path of the configuration folder from which the script loads configuration files | No |
| -g | Prints detailed garbage collection (GC) information | No |
| -H | Specifies the path of the Java heap dump file, used when JVM memory overflows | No |
| -E | Specifies the path of the JVM error log file | No |
| -D | Defines a system property in the format key=value | No |
| -X | Directly passes \-XX parameters to the JVM | No |
| -h | Help command | No |
Note: After a DataNode is added, as new writes arrive, and as old data expires if TTL is configured, the cluster load gradually balances toward the new DataNode and eventually reaches a balance of storage and compute resources across all nodes.
3.2.2 Removing a DataNode
First connect to the cluster through the CLI and use show datanodes to confirm the NodeID of the DataNode to be removed:
IoTDB> show datanodes
+------+-------+----------+-------+-------------+---------------+
|NodeID| Status|RpcAddress|RpcPort|DataRegionNum|SchemaRegionNum|
+------+-------+----------+-------+-------------+---------------+
|     1|Running|   0.0.0.0|   6667|            0|              0|
|     2|Running|   0.0.0.0|   6668|            1|              1|
|     3|Running|   0.0.0.0|   6669|            1|              0|
+------+-------+----------+-------+-------------+---------------+
Total line number = 3
It costs 0.110s
Then use SQL to remove the DataNode:
remove datanode [datanode_id]4. Manual Load Balancing
Manual load balancing (Region migration) is an advanced operations and maintenance feature with certain operating costs. Read this section completely before using it. If you have any questions, contact the IoTDB team for technical support.
4.1 Feature Description
IoTDB is a distributed database. Region is the basic unit for distributed storage of data in an IoTDB cluster. During normal cluster operation, IoTDB automatically balances newly written data. In scenarios such as adding a new DataNode to the cluster or recovering data after the disk of a DataNode machine is damaged, manual Region migration can be used to finely adjust cluster load and operations.
4.2 Notes
It is recommended to use Region migration only on IoTDB 1.3.3 and later.
Region migration is supported only when the consensus protocol is IoTConsensus or Ratis, as configured by
schema_region_consensus_protocol_classanddata_region_consensus_protocol_classiniotdb-system.properties.Region migration consumes system resources such as disk and network bandwidth. It is recommended to perform it during periods of low business load.
Ideally, Region migration does not affect user-side reads and writes. In special cases, Region migration may block writes. See the usage instructions for how to identify and handle this situation.
Avoid using this feature when time partitions are switching.
4.3 Usage
Syntax definition:
Submit an asynchronous task to migrate a Region from one DataNode to another.
migrateRegion
      : MIGRATE REGION regionId=INTEGER_LITERAL FROM fromId=INTEGER_LITERAL TO toId=INTEGER_LITERAL
      ;
Syntax example:
Migrate Region 1 from DataNode 2 to DataNode 3:
IoTDB> migrate region 1 from 2 to 3
  Msg: The statement is executed successfully.
The statement is executed successfullyonly means that the Region migration task was submitted successfully, not that it has completed. View task execution status through the CLI commandshow regions.Related configuration:
- Migration speed control: modify the
region_migration_speed_limit_bytes_per_secondparameter iniotdb-system.propertiesto control Region migration speed.
- Migration speed control: modify the
Time estimation:
- If there are no concurrent writes during migration, the elapsed time can be roughly estimated by dividing Region data volume by data transfer speed. The actual data transfer speed is jointly determined by disk, network bandwidth, and the migration speed limit parameter.
- If there are concurrent writes during migration, the elapsed time increases. The exact time depends on write pressure, system resources, and other factors. A rough estimate is the no-concurrent-write time multiplied by 1.5.
Migration progress observation: During migration, run
SHOW MIGRATIONSthrough the CLI to observe state changes. See 6.1 SHOW MIGRATIONS for the syntax and usage.Write blocking:
Region migration in IoTConsensus does not directly block writes. However, WAL file cleanup must be blocked during the process. If WAL files accumulate and reach the
wal_throttle_threshold_in_bytethreshold, the current DataNode pauses writes until the WAL files fall below the threshold.If write errors occur during migration because WAL reaches the threshold, for example,
The write is rejected because the wal directory size has reached the threshold, increasewal_throttle_threshold_in_byteto 500 GB or more to allow writes to continue:IoTDB> set configuration "wal_throttle_threshold_in_byte"="536870912000" Msg: The statement is executed successfully.
4.4 Scenario Example
By default, historical data is not automatically migrated after scaling. To balance data distribution across nodes, manually migrate Regions. As shown in the following figure, assume that 80 TB of data from old nodes is balanced to new nodes. When the data volume of a single Region is 1 TB and the transfer speed is 100 MB/s, migration takes about 3 hours.
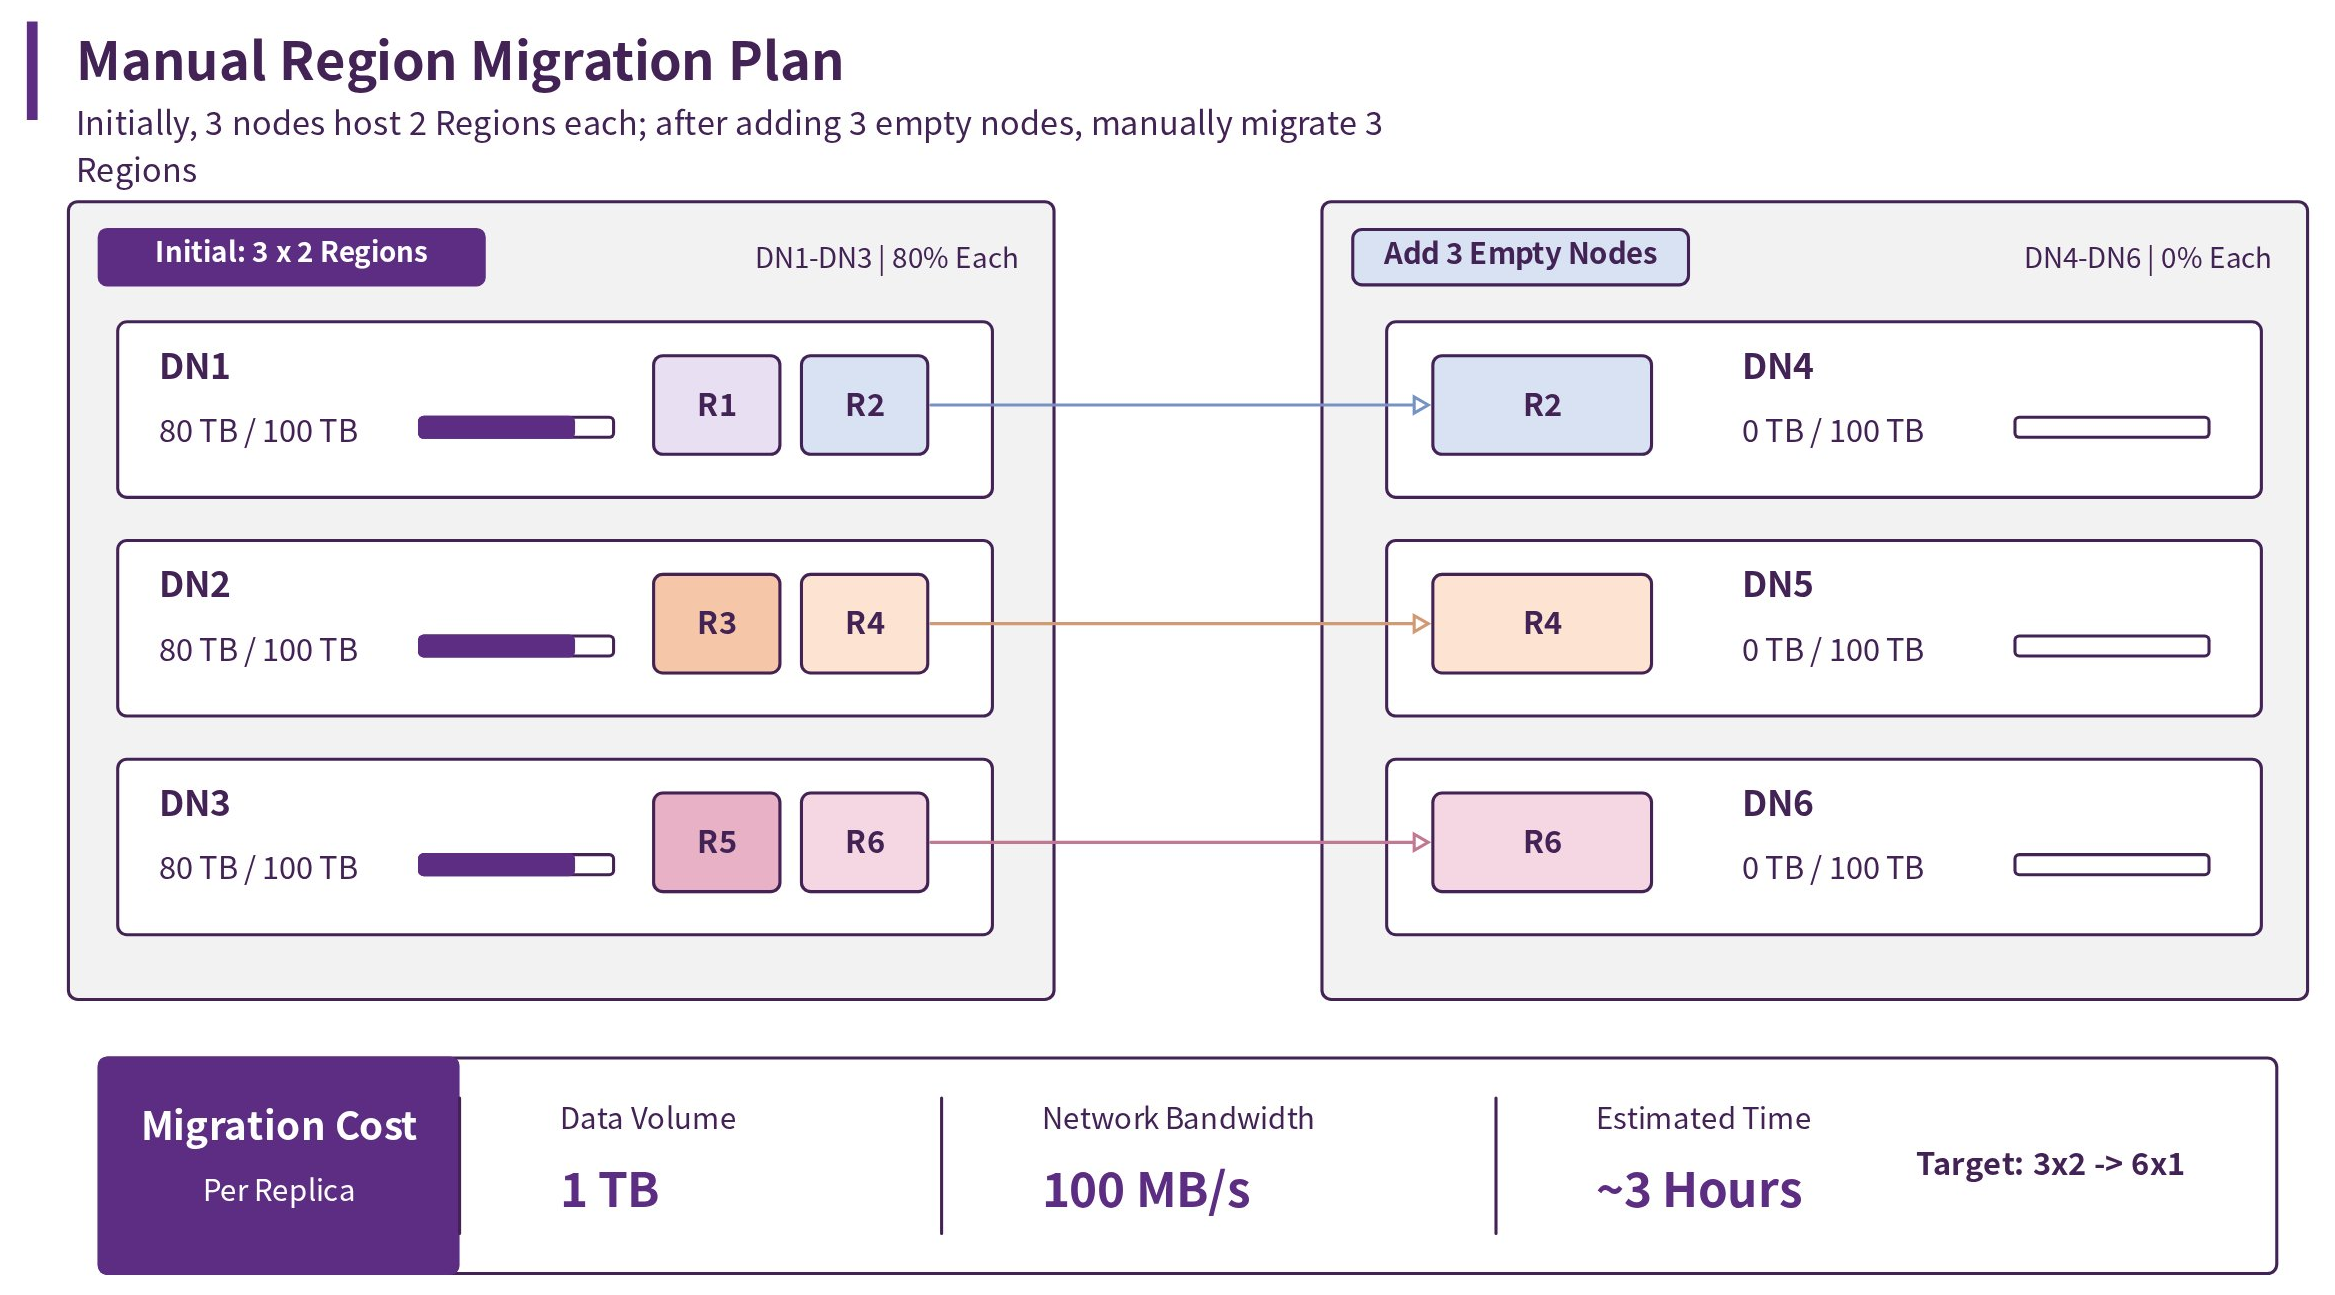
The specific operations are as follows:
-- 1. Migrate the replica data of Region-1 from DataNode-2 to DataNode-4.
migrate region 1 from 2 to 4

-- 2. Migrate the replica data of Region-2 from DataNode-3 to DataNode-5.
migrate region 2 from 3 to 5

-- 3. Migrate the replica data of Region-3 from DataNode-1 to DataNode-6.
migrate region 3 from 1 to 6
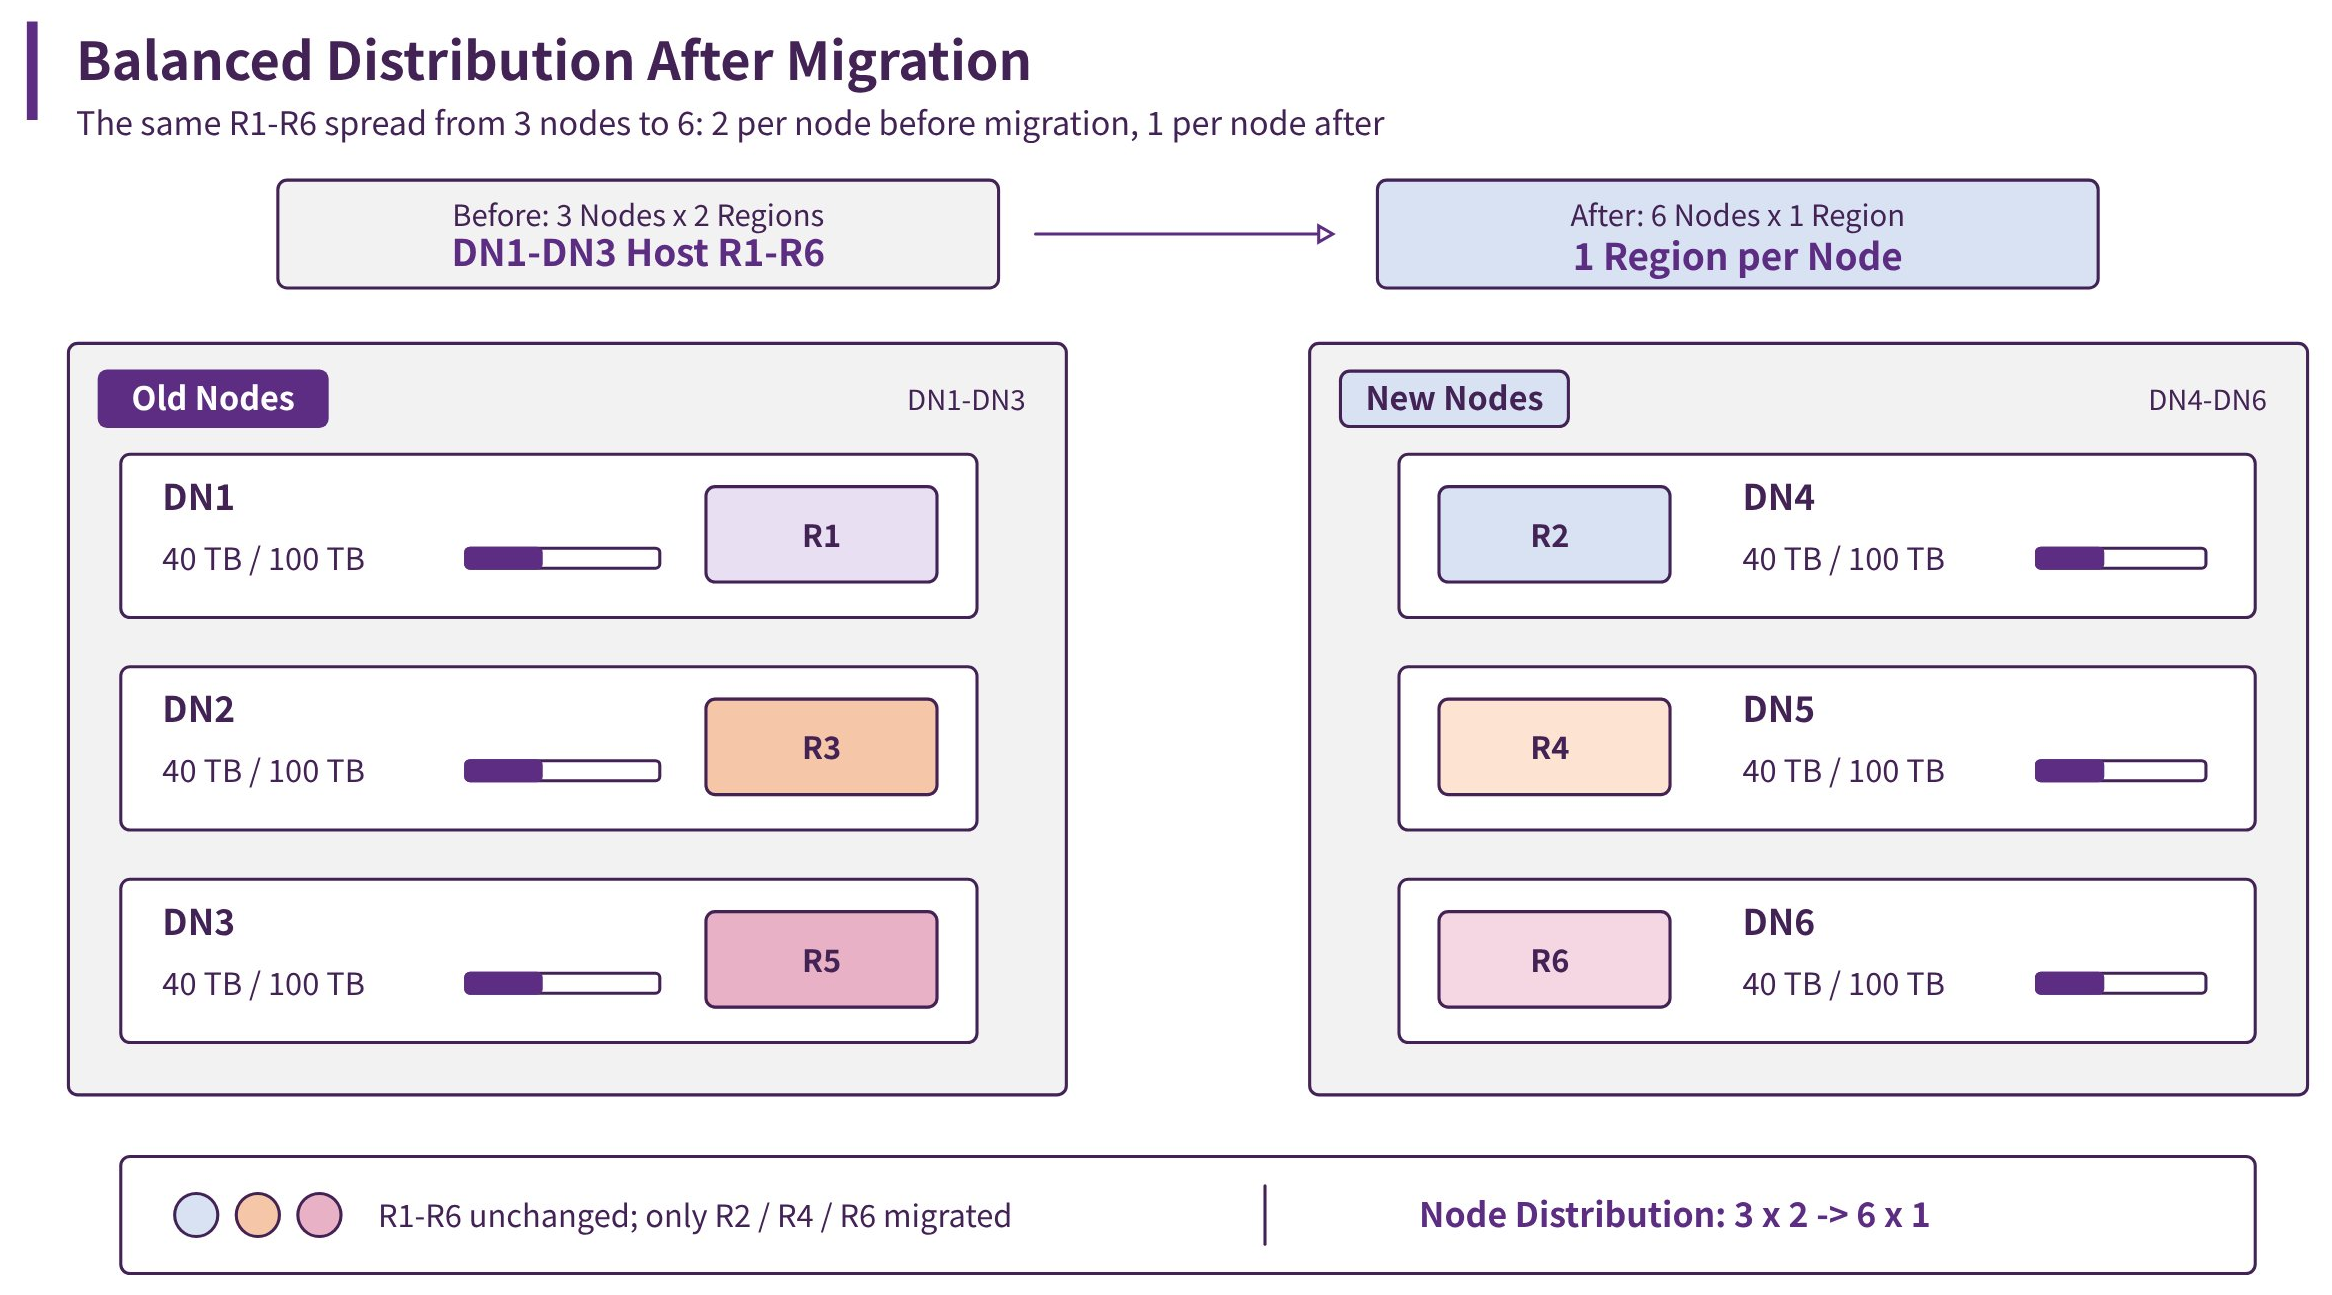
After migration is complete, Region data in the system is redistributed between old nodes and new nodes, achieving balanced disk space and optimized resource utilization.
4.5 Supplementary Syntax (Not Recommended)
Note:
EXTEND REGIONandREMOVE REGIONare high-risk operations and maintenance commands and are not recommended for regular use. Use them with caution in production environments. In general, Region migration should useMIGRATE REGION; Region reconstruction should useRECONSTRUCT Region.
4.5.1 Extend Region
Extend one or more Regions to a specified DataNode.
Syntax definition:
extendRegion
    : EXTEND REGION regionIds+=INTEGER_LITERAL (COMMA regionIds+=INTEGER_LITERAL)* TO targetDataNodeId=INTEGER_LITERAL
    ;
Syntax example:
Extend Region 1 to DataNode 3:
IoTDB> extend region 1 to 3
Msg: The statement is executed successfully.
4.5.2 Remove Region
Remove one or more Region replicas from a specified DataNode.
Syntax definition:
removeRegion
    : REMOVE REGION regionIds+=INTEGER_LITERAL (COMMA regionIds+=INTEGER_LITERAL)* FROM targetDataNodeId=INTEGER_LITERAL
    ;
Syntax example:
Remove Region 1 from DataNode 2:
IoTDB> remove region 1 from 2
Msg: The statement is executed successfully.
5. Automatic Load Balancing
Automatic load balancing (Region rebalancing) is an advanced operations and maintenance feature with certain operating costs. Read this section completely before using it. If you have any questions, contact the IoTDB team for technical support.
Supported since V2.0.10.1.
5.1 Feature Description
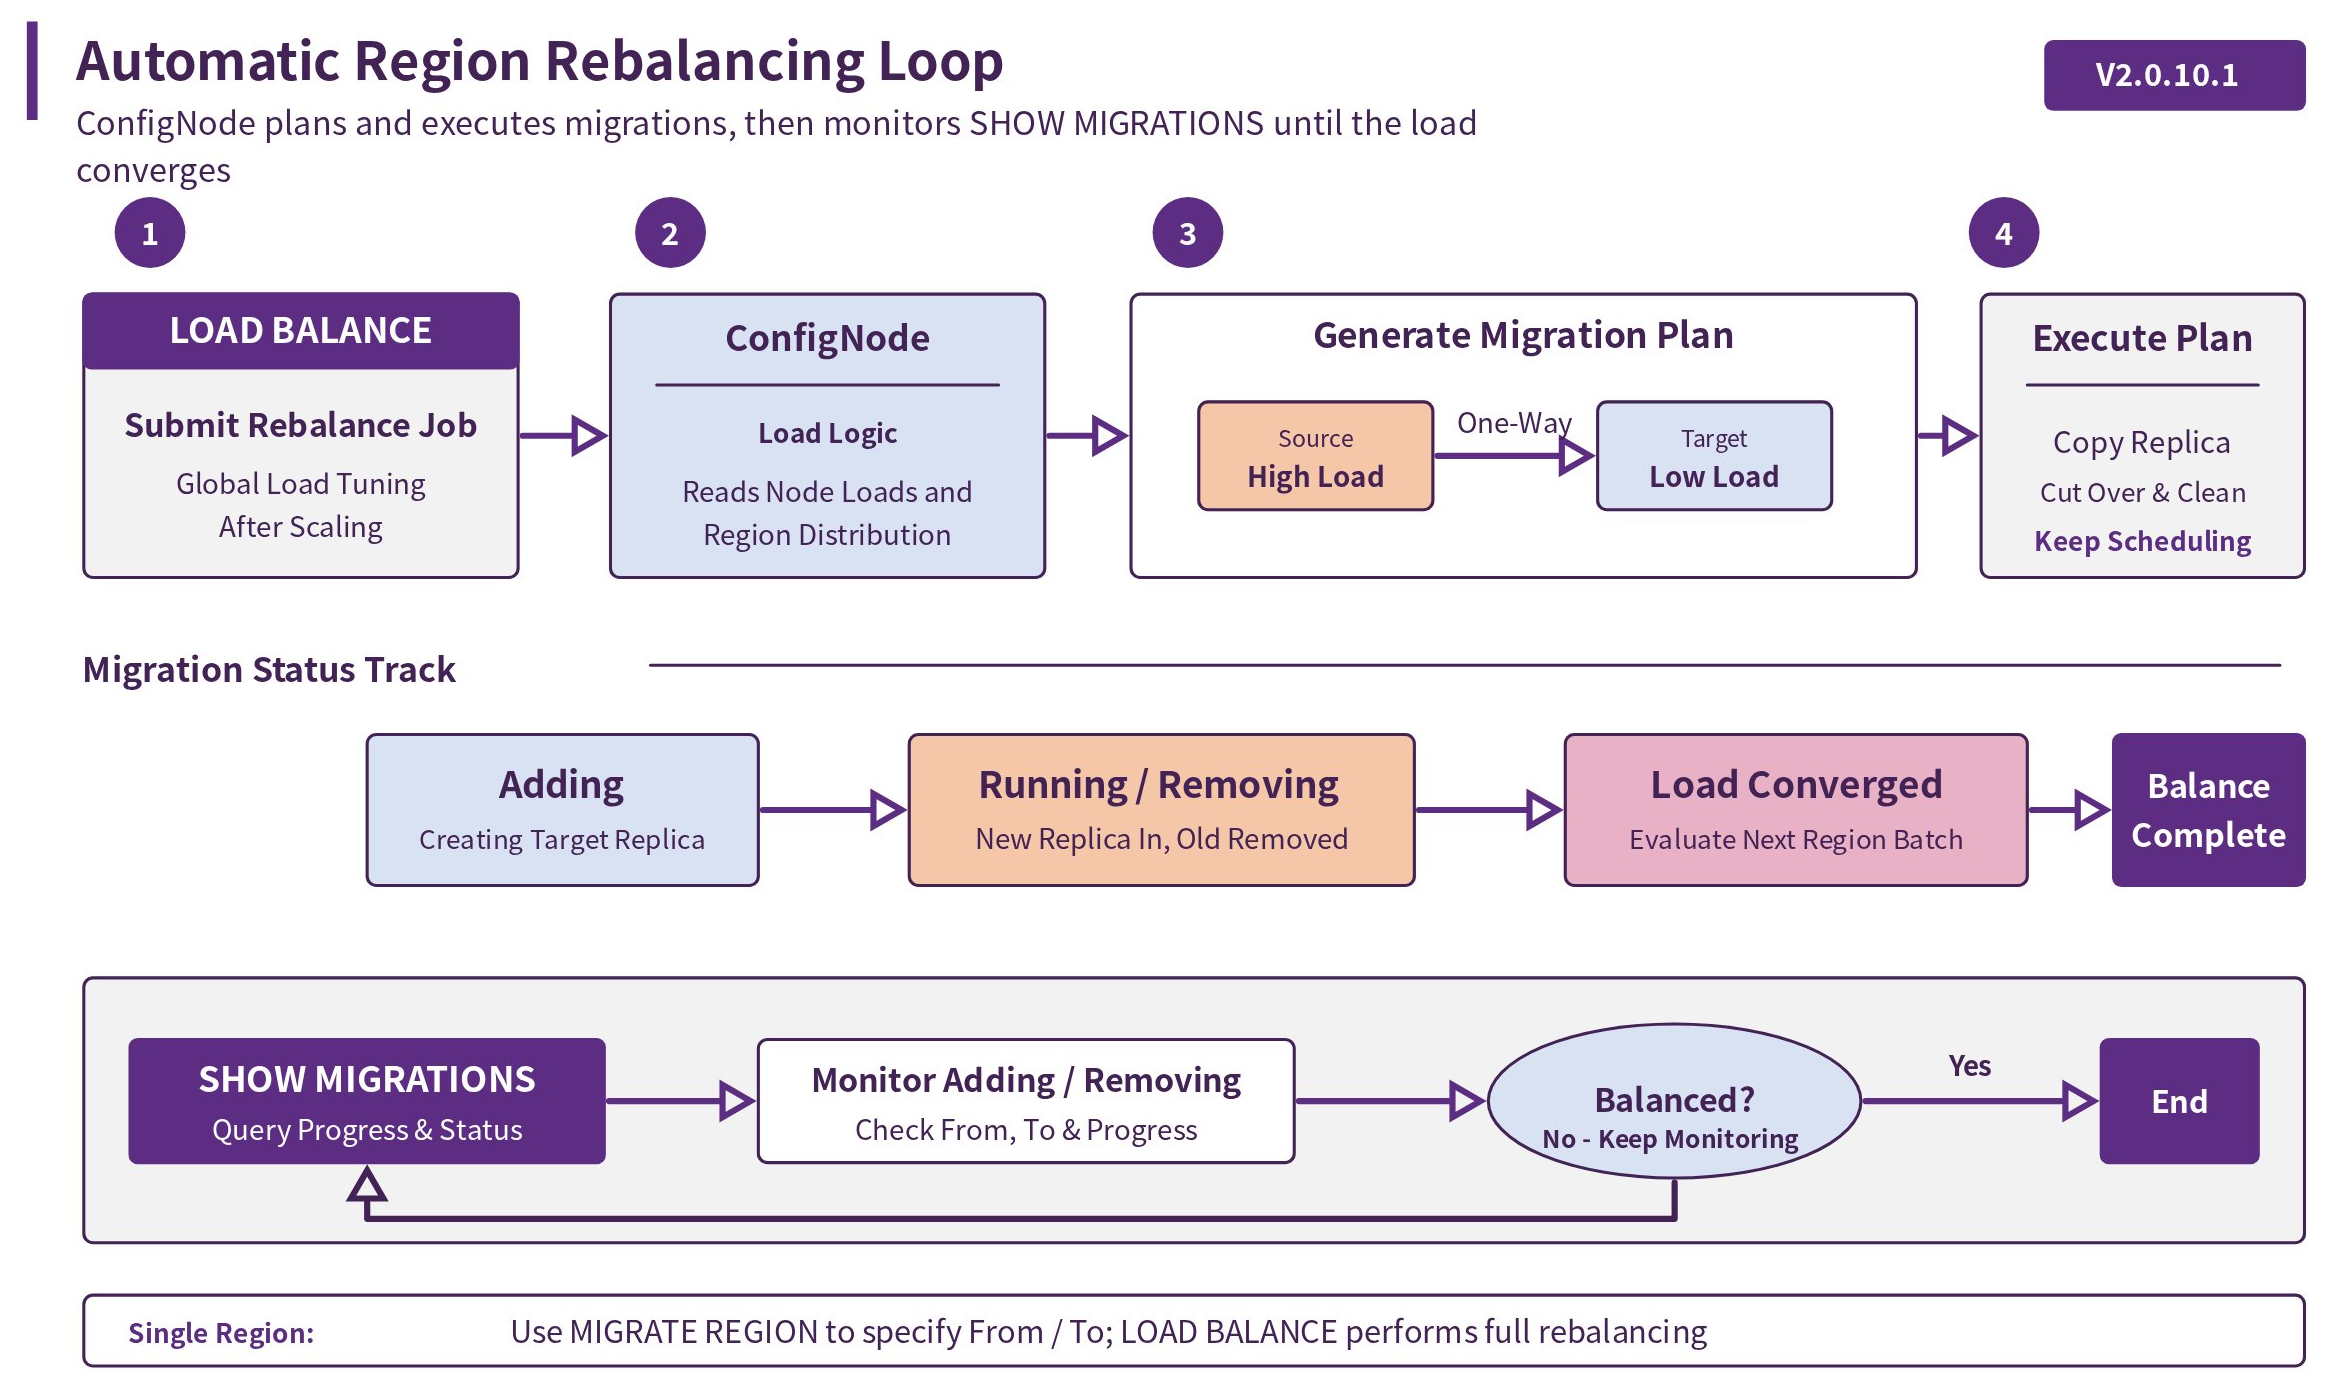
The Region rebalancing feature allows you to submit a rebalancing task with one SQL statement. The system calculates a Region migration plan in the background by using the scaling balance algorithm, and ConfigNode schedules the execution. This feature is not limited to scaling scenarios. You can also use it when Region sizes are uneven, disk usage is unbalanced across nodes, or write load is concentrated on a small number of Regions.
LOAD BALANCE automatically generates and executes a group of Region migration tasks, which is suitable for overall rebalancing. migrate region is suitable when you already know the RegionId, source DataNode, and target DataNode for fine-grained migration. After submitting an automatic rebalancing task, use SHOW MIGRATIONS to observe the generated migration tasks and their progress. To stop current migration tasks while they are running, execute CANCEL ALL MIGRATIONS, and then use SHOW MIGRATIONS and SHOW REGIONS to confirm the result.
Note that CANCEL ALL MIGRATIONS does not mean every task stops immediately. The system prioritizes cancellation of tasks that are still adding replicas. If a task has already started removing an old replica, the system allows it to finish to preserve a stable cluster state.
- Applicable scenarios: after scaling, historical Regions need to be migrated to new nodes automatically; disk usage is obviously unbalanced across nodes; some DataNodes have high write pressure and Region distribution needs to be adjusted overall.
- Scenarios requiring caution: during business peak hours, or when network or disk I/O resources are tight, evaluate the resource usage introduced by migration first. If you need precise control over a Region migration path, use manual Region migration.
5.2 LOAD BALANCE
-- Trigger system load balancing. The system automatically selects target nodes.
LOAD BALANCE;

-- Specify target DataNode IDs and execute load balancing.
LOAD BALANCE TO DATANODES(*DataNodeId,DataNodeId*);- Mechanism
The statement submits a global or local distributed balancing task to ConfigNode for asynchronous execution. After the task is triggered, DataNodes in the cluster are divided into two role pools, and physical data migration follows a strict one-way constraint:
From nodes: the source node pool that provides Region data to be migrated.
To nodes: the target node pool that receives migrated data.
One-way migration rule: data can only migrate from From nodes to To nodes.
Notes
- When TTL is configured, load balancing occurs automatically. Using this command is not recommended.
- Avoid using this command shortly before a time partition switch.
Parameter Description
| Parameter | Required | Description |
|---|---|---|
| TO DATANODES | No | Explicitly passes one or more DataNodeId values separated by commas. The specified nodes are assigned to the To node pool that receives data, and the remaining nodes are automatically assigned to the From node pool that provides data. |
- Default Behavior
| Execution mode | Behavior |
|---|---|
Without parameters (LOAD BALANCE) | The system selects the node with the smallest current disk usage as the only To node by default. |
With parameters (LOAD BALANCE TO DATANODES(...)) | The specified nodes are forced into the To node pool, and the remaining nodes become From nodes. |
- Expected Result
After the command is executed, the console immediately returns Msg: The statement is executed successfully. This only means ConfigNode has accepted the load balancing task and queued the generated subtasks. Large-scale physical migration then runs asynchronously in the background. Use SHOW MIGRATIONS to view the task list, current state, and migration progress. To stop current migration tasks, execute CANCEL ALL MIGRATIONS. For syntax and usage, see 6. Migration Task Monitoring and Management.
- Related Configuration
In iotdb-system.properties, use region_migration_speed_limit_bytes_per_second to control the Region migration transfer limit of each DataNode. The unit is byte/s. The default value is 50331648, approximately 48 MiB/s. You can reduce this value during busy periods and increase it during off-peak periods. Do not set it too low, otherwise migration time increases significantly and migration may even be blocked. A value less than or equal to 0 means no speed limit. This parameter takes effect only for the IoTConsensus protocol and supports hot loading.
5.3 Scenario Example
The following example simulates a real industrial scenario. As business data continues to grow, a system originally using two core data nodes needs to expand to a three-DataNode architecture with higher throughput and more storage headroom, while using dual-replica redundancy, that is, smooth scaling from 1C2D to 1C3D. The cluster initially has 1 ConfigNode and 2 DataNodes. After DataNode 3 is added, automatic Region rebalancing lets the new node carry part of the historical Regions and relieves storage pressure on the original nodes.
The SQL results below are only examples for explaining the key process. Some outputs are excerpted. Actual results depend on cluster scale, Region count, database names, time partitions, node addresses, and other factors.
- Before scaling, run
show clusterto view cluster nodes. The cluster has only DataNode 1 and DataNode 2.
IoTDB> show cluster
+------+----------+-------+---------------+------------+--------+---------+--------------+
|NodeID|  NodeType| Status|InternalAddress|InternalPort| Version|BuildInfo|ActivateStatus|
+------+----------+-------+---------------+------------+--------+---------+--------------+
|     0|ConfigNode|Running|   confignode-1|       10710|2.0.10.1|  53e***|     ACTIVATED|
|     1|  DataNode|Running|    datanode-1|       10730|2.0.10.1|  53e***|     ACTIVATED|
|     2|  DataNode|Running|    datanode-2|       10730|2.0.10.1|  53e***|     ACTIVATED|
+------+----------+-------+---------------+------------+--------+---------+--------------+- After scaling, run
show clusterto confirm DataNode 3 has joined the cluster and its status is Running.
IoTDB> show cluster
+------+----------+-------+---------------+------------+--------+---------+--------------+
|NodeID|  NodeType| Status|InternalAddress|InternalPort| Version|BuildInfo|ActivateStatus|
+------+----------+-------+---------------+------------+--------+---------+--------------+
|     0|ConfigNode|Running|   confignode-1|       10710|2.0.10.1|  53e***|     ACTIVATED|
|     1|  DataNode|Running|    datanode-1|       10730|2.0.10.1|  53e***|     ACTIVATED|
|     2|  DataNode|Running|    datanode-2|       10730|2.0.10.1|  53e***|     ACTIVATED|
|     3|  DataNode|Running|    datanode-3|       10730|2.0.10.1|  53e***|     ACTIVATED|
+------+----------+-------+---------------+------------+--------+---------+--------------+- Run
LOAD BALANCEto submit a rebalancing task. A successful submission only means ConfigNode has accepted the task. If you want to explicitly specify the new node as the migration target, useTO DATANODESto specify the target DataNodeId.
IoTDB> LOAD BALANCE;

-- Or specify DataNode 3 as the target node.
IoTDB> LOAD BALANCE TO DATANODE 3;- Run
show migrationsto observe background migration tasks. The console shows queued and running subtasks, such as Region replicas being migrated from DataNode 1 and DataNode 2 to DataNode 3.
IoTDB> show migrations
+-----------+--------+------------+----------+--------+------------------------+---------------+-----------------------+-----------------------+----------------+---------------------------------+
|ProcedureId|RegionId|        Type|FromNodeId|ToNodeId|            CurrentState|ProcedureStatus|          SubmittedTime|         LastUpdateTime|        Duration|                         Progress|
+-----------+--------+------------+----------+--------+------------------------+---------------+-----------------------+-----------------------+----------------+---------------------------------+
|        101|       3|  DataRegion|         1|       3|   CHECK_ADD_REGION_PEER|        WAITING|2026-06-03T16:29:25.051|2026-06-03T16:29:25.159| 2 second 897 ms|files 8/96, size 24 GB/280 GB    |
|        102|       5|  DataRegion|         2|       3|   CHECK_ADD_REGION_PEER|        WAITING|2026-06-03T16:29:25.059|2026-06-03T16:29:25.163| 2 second 889 ms|files 5/72, size 18 GB/210 GB    |
|        103|       4|SchemaRegion|         1|       3|CHECK_REMOVE_REGION_PEER|        WAITING|2026-06-03T16:29:25.067|2026-06-03T16:29:26.807| 2 second 876 ms|                                 |
+-----------+--------+------------+----------+--------+------------------------+---------------+-----------------------+-----------------------+----------------+---------------------------------+- If a business peak arrives early, or disk I/O and network bandwidth must be prioritized for online workloads, first use
show migrationsto confirm the task state, and then executeCANCEL ALL MIGRATIONSto stop current migration tasks.
IoTDB> cancel all migrations;
Msg: The statement is executed successfully.
A successful response means ConfigNode has accepted the cancellation request. Continue running show migrations to observe whether tasks disappear, and run show regions to confirm whether Adding replicas on the target node have been cleaned up. If some tasks have already started removing old replicas from source nodes, the system continues those tasks. The final state is determined by show regions after the tasks finish.
- If the tasks were not canceled, or some tasks had already started removing old replicas and continued running, use
show regionsduring migration to observe that Regions on the target node enter theAddingstate. DataNode 3 creates the corresponding Region directories locally, and source DataNodes package local persisted TsFiles into snapshots and deliver them to DataNode 3 through cross-network RPC. The following output only excerpts DataRegion rows related to this rebalancing.
IoTDB> show regions
+--------+----------+-------+--------------+-------------+-----------+----------+----------+-------+---------------+--------+-----------------------+----------+----------------+
|RegionId|      Type| Status|      Database|SeriesSlotNum|TimeSlotNum|DataNodeId|RpcAddress|RpcPort|InternalAddress|    Role|             CreateTime|TsFileSize|CompressionRatio|
+--------+----------+-------+--------------+-------------+-----------+----------+----------+-------+---------------+--------+-----------------------+----------+----------------+
|       3|DataRegion|Running|root.industry|            8|          1|         1|     host1|   6667|     datanode-1|Follower|2026-06-03T16:26:45.691|    280 GB|            3.24|
|       3|DataRegion|Running|root.industry|            8|          1|         2|     host2|   6667|     datanode-2|  Leader|2026-06-03T16:26:45.691|    280 GB|            3.24|
|       3|DataRegion| Adding|root.industry|            8|          1|         3|     host3|   6667|     datanode-3|Follower|2026-06-03T16:26:45.691|   Unknown|             NaN|
+--------+----------+-------+--------------+-------------+-----------+----------+----------+-------+---------------+--------+-----------------------+----------+----------------+- After DataNode 3 receives the snapshot and replays WAL data generated during migration, the new replica enters the
Runningstate. At the same time, the corresponding Region replica on the original node is marked asRemovingand is deleted and cleaned up. Whenshow migrationsreturns an empty result, the migration task has ended and there are currently no running migration tasks.
IoTDB> show migrations
+-----------+--------+----+----------+--------+------------+---------------+-------------+--------------+--------+--------+
|ProcedureId|RegionId|Type|FromNodeId|ToNodeId|CurrentState|ProcedureStatus|SubmittedTime|LastUpdateTime|Duration|Progress|
+-----------+--------+----+----------+--------+------------+---------------+-------------+--------------+--------+--------+
+-----------+--------+----+----------+--------+------------+---------------+-------------+--------------+--------+--------+- Query
show regionsagain to confirm that related Regions have migrated to the target node and returned to theRunningstate. As shown below, after some Region replicas migrate to DataNode 3, DataNode 1, DataNode 2, and DataNode 3 all continue to carry historical DataRegions. The following output still only excerpts DataRegion rows related to this rebalancing.
IoTDB> show regions
+--------+----------+-------+--------------+-------------+-----------+----------+----------+-------+---------------+--------+-----------------------+----------+----------------+
|RegionId|      Type| Status|      Database|SeriesSlotNum|TimeSlotNum|DataNodeId|RpcAddress|RpcPort|InternalAddress|    Role|             CreateTime|TsFileSize|CompressionRatio|
+--------+----------+-------+--------------+-------------+-----------+----------+----------+-------+---------------+--------+-----------------------+----------+----------------+
|       3|DataRegion|Running|root.industry|            8|          1|         2|     host2|   6667|     datanode-2|Follower|2026-06-03T16:26:45.691|    280 GB|            3.24|
|       3|DataRegion|Running|root.industry|            8|          1|         3|     host3|   6667|     datanode-3|  Leader|2026-06-03T16:26:45.691|    280 GB|            3.24|
|       5|DataRegion|Running|root.industry|            6|          1|         1|     host1|   6667|     datanode-1|  Leader|2026-06-03T16:26:45.698|    210 GB|            2.86|
|       5|DataRegion|Running|root.industry|            6|          1|         3|     host3|   6667|     datanode-3|Follower|2026-06-03T16:26:45.698|    210 GB|            2.86|
|       7|DataRegion|Running|root.industry|            7|          1|         1|     host1|   6667|     datanode-1|Follower|2026-06-03T16:26:45.717|    240 GB|            3.10|
|       7|DataRegion|Running|root.industry|            7|          1|         2|     host2|   6667|     datanode-2|  Leader|2026-06-03T16:26:45.717|    240 GB|            3.10|
+--------+----------+-------+--------------+-------------+-----------+----------+----------+-------+---------------+--------+-----------------------+----------+----------------+
6. Migration Task Monitoring and Management
Both MIGRATE REGION tasks submitted through Manual Load Balancing and LOAD BALANCE tasks submitted through Automatic Load Balancing generate a set of asynchronous Region migration subtasks. This section describes the SQL statements used to monitor and cancel these background migration tasks. The statements apply to both scenarios.
6.1 SHOW MIGRATIONS
Because balancing tasks may transfer hundreds of GB of data across nodes, the system provides the following SQL statement to view background migration tasks that are currently running. It returns task states, elapsed time, migration progress, and other information.
SHOW MIGRATIONS- Result Set Description
| Field | Description |
|---|---|
| ProcedureId | Unique task identifier |
| RegionId | Region ID |
| Type | Region type |
| OperationType | Operation type, such as MIGRATE, EXTEND, REMOVE, or RECONSTRUCT. Automatic rebalancing tasks triggered by LOAD BALANCE usually appear as MIGRATE. |
| FromNodeId | Source DataNode ID |
| ToNodeId | Target DataNode ID |
| CurrentState | Current state, such as REGION_MIGRATE_PREPARE, ADD_REGION_PEER, or REMOVE_REGION_PEER |
| ProcedureStatus | Task status, such as RUNNING, FINISHED, or FAILED |
| SubmittedTime | Task submission time |
| LastUpdateTime | Last update time |
| Duration | Elapsed time |
| Progress | Migration progress, including migrated file count / total file count |
Example:
IoTDB> show migrations
+-----------+--------+----------+----------+--------+---------------------+---------------+-----------------------+-----------------------+----------------+---------------------------------+
|ProcedureId|RegionId|      Type|FromNodeId|ToNodeId|         CurrentState|ProcedureStatus|          SubmittedTime|         LastUpdateTime|        Duration|                         Progress|
+-----------+--------+----------+----------+--------+---------------------+---------------+-----------------------+-----------------------+----------------+---------------------------------+
|         11|       5|DataRegion|         2|       3|CHECK_ADD_REGION_PEER|        WAITING|2026-06-03T15:47:35.840|2026-06-03T15:47:35.966|31 second 169 ms|files 1/3, size 15.52 KB/15.61 KB|
+-----------+--------+----------+----------+--------+---------------------+---------------+-----------------------+-----------------------+----------------+---------------------------------+
Total line number = 1
It costs 0.004s- Joint Status Observation with SHOW REGIONS
During migration, the states of related Regions also change. In a 2-replica cluster, when SHOW MIGRATIONS displays a running task, execute SHOW REGIONS to observe the Region passing through these states:
- Stable state before migration:
Running,Running. - Copy expansion transition:
Running,Running,Adding. The target To node creates a Region replica and receives the snapshot. A replica in theAddingstate does not provide service. - Safe removal transition:
Removing,Running,Running. The target node catches up and becomesRunning, while the original From node becomesRemovingfor deletion and cleanup. - New stable state after migration: after the old Region is deleted successfully, the state returns to
Running,Running.
6.2 CANCEL ALL MIGRATIONS
After an automatic rebalancing or manual Region operation has been submitted, you may discover that a business peak has arrived early, disk I/O or network bandwidth must be prioritized for online reads and writes, or the selected target node is not as expected. In these cases, use CANCEL ALL MIGRATIONS to stop Region migration tasks that are currently running. This statement is supported starting from V2.0.11.1.
-- Cancel all Region migration and replica operations currently running in the cluster.
CANCEL ALL MIGRATIONS- Mechanism
CANCEL ALL MIGRATIONS submits a global cancellation request to ConfigNode. After receiving the request, ConfigNode sends a cancellation signal to the Region migration tasks that are currently running and immediately returns a result to the client.
This operation uses cooperative cancellation rather than forcibly stopping tasks immediately. A successful command response only means the cancellation request has been accepted. Each task checks the cancellation request later at an appropriate point and then determines whether it can stop. Continue using SHOW MIGRATIONS to observe task states after executing the command.
- Affected Tasks
CANCEL ALL MIGRATIONS applies to the same tasks displayed by SHOW MIGRATIONS, covering the MIGRATE, EXTEND, REMOVE, and RECONSTRUCT operation types. Region migration tasks generated automatically by LOAD BALANCE are also included.
The statement applies to the entire cluster and does not distinguish between the Tree and Table models. Regardless of the SQL dialect used to submit the statement, it sends a cancellation signal to currently running migration tasks.
- Parameters
The statement accepts no parameters and does not support filtering by RegionId, node, or operation type. In this version, its semantics are to cancel all migration and replica operations that are currently running.
- Expected Result
The console immediately returns the following result:
Msg: The statement is executed successfully.This result means ConfigNode has accepted the cancellation request. Whether a task actually stops depends on its current stage. Continue executing SHOW MIGRATIONS to observe whether tasks disappear, and use SHOW REGIONS to confirm that Region replica distribution is as expected.
- Notes
CANCEL ALL MIGRATIONS primarily affects the add-replica stage. This stage usually takes a relatively long time, and the new replica on the target node has not taken effect yet, so it can be stopped and cleaned up safely.
If a task has entered the remove-old-replica stage, the system usually continues the task until it finishes. This stage is relatively fast. Once the old replica is actually being deleted, forcibly interrupting the operation is unsafe. Letting the task finish prevents the Region from remaining in an incomplete intermediate state.
6.2.1 Cancellation Behavior
| Operation Type | Trigger Statement | Stage That Can Usually Be Canceled | Stage That Usually Continues to Completion |
|---|---|---|---|
EXTEND (add replica) | EXTEND REGION | This operation only adds a replica and does not delete an old replica. After receiving a cancellation request, the system attempts to stop the add operation and cleans up the Adding replica on the target node. | None. This operation does not delete an old replica. |
MIGRATE (add, then remove) | MIGRATE REGION / LOAD BALANCE | The task can usually be canceled during preparation and replica addition. After cancellation, the incomplete replica on the target node is cleaned up and the original replica remains on the source node. | If the new replica has been created and the task has started removing the old replica from the source node, the system continues the task. |
REMOVE (remove replica) | REMOVE REGION | The task can usually be canceled before the target replica is actually deleted. After cancellation, the replica is retained and returns to the Running state. | If deletion of the target replica has started, the system completes deletion and cleanup. |
RECONSTRUCT (remove, then recreate) | RECONSTRUCT REGION | The task can usually be canceled before the old replica is removed. After cancellation, the old replica is retained. | If the old replica has been removed, the system continues recreating the replica until recovery is complete. |
In short,
CANCEL ALL MIGRATIONSis primarily used to stop tasks that are still adding replicas. If a task has actually started removing an old replica, the system allows it to finish to avoid leaving an incomplete replica state.
6.2.2 Recommended Procedure
Use SHOW MIGRATIONS, CANCEL ALL MIGRATIONS, and SHOW REGIONS together:
- Execute
SHOW MIGRATIONSto view currently running migration tasks, task states, and migration progress. - If business resources are constrained or you have confirmed that migration must stop, execute
CANCEL ALL MIGRATIONS. - Execute
SHOW MIGRATIONSagain. Canceled tasks gradually disappear from the result. Tasks that have entered the removal stage continue running and disappear after completion. - Execute
SHOW REGIONSto confirm Region replica distribution. For a canceled add-replica task, theAddingreplica on the target node is cleaned up. For tasks that continued running, use the finalSHOW REGIONSresult as the authoritative state.
Example:
-- 1. Observe current migration tasks.
IoTDB> SHOW MIGRATIONS;

-- 2. Send a cancellation request after determining that migration must stop.
IoTDB> CANCEL ALL MIGRATIONS;
Msg: The statement is executed successfully.

-- 3. Continue observing whether tasks disappear.
IoTDB> SHOW MIGRATIONS;

-- 4. Confirm Region replica distribution.
IoTDB> SHOW REGIONS;
7. Appendix: Common Configuration Parameters
The configuration file is conf/iotdb-system.properties. Parameters prefixed with cn_ apply to ConfigNode, parameters prefixed with dn_ apply to DataNode, and parameters without these prefixes are usually cluster-level settings. Hot-loadable parameters can be adjusted online with SET CONFIGURATION. Parameters that take effect after restart require you to modify the configuration and restart the corresponding node. Parameters that cannot be changed after the first startup must be planned before initialization.
7.1 Parameters by Maintenance Operation
| Maintenance Operation | Parameters to Review |
|---|---|
| Cluster scaling / Add DataNode | dn_seed_config_node, dn_rpc_address/port, dn_internal_address/port, dn_mpp_data_exchange_port, dn_schema_region_consensus_port, dn_data_region_consensus_port, cluster_name, dn_join_cluster_retry_interval_ms |
| Add ConfigNode | cn_seed_config_node, cn_internal_address/port, cn_consensus_port. Multiple ConfigNodes require RatisConsensus. |
| Remove ConfigNode / DataNode | Confirm that the remaining nodes can satisfy schema_replication_factor and data_replication_factor to avoid insufficient replicas after removal. |
| Manual Region migration | data_region_consensus_protocol_class, region_migration_speed_limit_bytes_per_second, region_migration_file_remove_speed_limit_bytes_per_second, region_migration_concurrency_limit, wal_throttle_threshold_in_byte |
| Automatic Region rebalancing | data_region_per_data_node, region_migration_speed_limit_bytes_per_second, region_migration_file_remove_speed_limit_bytes_per_second, region_migration_concurrency_limit |
| Fault recovery / Node availability detection | heartbeat_interval_in_ms, disk_space_warning_threshold. If a node fails to join, also check dn_join_cluster_retry_interval_ms. |
7.2 Node Joining and Initialization Planning
| Parameter | Scope | Default / Effective Mode | Maintenance Guidance |
|---|---|---|---|
cluster_name | Cluster | defaultCluster / Hot loading | Cluster identity. A new or scaled-out node must use the same value as the original cluster. Use SET CONFIGURATION to change it instead of manually editing the configuration file. |
cn_seed_config_node | ConfigNode | 127.0.0.1:10710 / Cannot be changed after first startup | Before a new ConfigNode joins the cluster, set this parameter to the internal address of any running ConfigNode in the original cluster. |
dn_seed_config_node | DataNode | 127.0.0.1:10710 / Cannot be changed after first startup | Before a new DataNode joins the cluster, set this parameter to the internal address of any running ConfigNode in the original cluster. |
cn_internal_address/port, cn_consensus_port | ConfigNode | 127.0.0.1:10710, 10720 / Cannot be changed after first startup | ConfigNode internal communication and consensus ports. In a multi-node deployment, use real addresses reachable from other nodes and ensure that the ports are accessible. |
dn_rpc_address/port | DataNode | 127.0.0.1:6667 / Restart required | Address and port used by clients to access the DataNode. When using a load balancer or providing external services, configure an address reachable by clients. |
dn_internal_address/port and related internal ports | DataNode | 10730/10740/10750/10760 / Cannot be changed after first startup | DataNode internal communication, MPP data exchange, and SchemaRegion/DataRegion consensus ports. Before scaling, confirm that the ports are unused and accessible between nodes. |
dn_join_cluster_retry_interval_ms | DataNode | 5000 / Restart required | Retry interval after initial DataNode registration fails. Network instability or a temporarily unreachable ConfigNode affects how quickly a new node joins the cluster. |
schema_replication_factor, data_replication_factor | ConfigNode | 1 / Cannot be changed after first startup | Determine the minimum number of available nodes for node removal and fault recovery. Plan these values before initializing a production cluster based on high-availability requirements. |
schema_region_consensus_protocol_class, data_region_consensus_protocol_class | ConfigNode | RatisConsensus / IoTConsensus / Cannot be changed after first startup | Determine the consensus protocols for metadata and data Regions. Region migration and rebalancing rely on IoTConsensus, IoTConsensusV2, or Ratis. SimpleConsensus is unsuitable for multi-replica migration scenarios. |
7.3 Partition and Region Scaling
| Parameter | Scope | Default / Effective Mode | Maintenance Guidance |
|---|---|---|---|
time_partition_interval | Cluster | 604800000 ms / Cannot be changed after first startup | Time partition interval, one week by default. It affects how often new time partitions are created, Region load distribution, and the balancing cycle after scaling. |
time_partition_origin | Cluster | 0 / Cannot be changed after first startup | Time partition origin. Plan this parameter only when custom time partition alignment is required. Do not change it after startup. |
data_region_group_extension_policy | ConfigNode | AUTO / Hot loading | DataRegionGroup extension policy for each Database. Keep AUTO for typical scenarios. Consider CUSTOM only when a fixed number is required. |
default_data_region_group_num_per_database | ConfigNode | 2 / Hot loading | Default number of DataRegionGroups for each Database. It affects how data Regions are distributed for new databases and after scaling. |
data_region_per_data_node | ConfigNode | 0 / Hot loading | Expected number of DataRegions managed by each DataNode under the AUTO policy. 0 estimates the value automatically from CPU core count. Re-evaluate this parameter if distribution is too dense or sparse after scaling. |
schema_region_group_extension_policy, schema_region_per_data_node | ConfigNode | AUTO, 1 / Hot loading | Control SchemaRegion extension and per-node capacity. Review these parameters when the number of Databases or the metadata volume is large. |
7.4 Region Migration and Rebalancing Control
| Parameter | Scope | Default / Effective Mode | Maintenance Guidance |
|---|---|---|---|
region_migration_speed_limit_bytes_per_second | DataNode | 50331648 / Hot loading | Region migration transfer rate limit, approximately 48 MiB/s by default. Currently supported only by IoTConsensus. |
region_migration_file_remove_speed_limit_bytes_per_second | DataNode | 16777216 / Hot loading | Local file cleanup rate limit after Region migration or removal, approximately 16 MiB/s by default. This parameter is independent of the migration transfer rate limit. Reduce it if cleanup affects online I/O, or increase it to release disk space faster. |
region_migration_concurrency_limit | ConfigNode | 0 / Hot loading | Maximum number of concurrent Region migration Procedures. 0 or a negative value means unlimited. Temporarily reduce it if migration consumes too much bandwidth or affects workloads. |
wal_throttle_threshold_in_byte | DataNode | 214748364800 / Hot loading | WAL accumulation threshold that triggers write throttling under IoTConsensus, approximately 200 GiB by default. Temporarily increase it if writes are rejected because the WAL reaches the threshold during migration. |
7.5 Health Detection and Read-Only Protection
| Parameter | Scope | Default / Effective Mode | Maintenance Guidance |
|---|---|---|---|
heartbeat_interval_in_ms | Cluster | 1000 / Hot loading | Heartbeat interval, which affects how frequently ConfigNode detects node states. Keep the default in typical scenarios and re-evaluate it only when fault recovery latency requirements are strict. |
disk_space_warning_threshold | DataNode | 0.05 / Hot loading | When remaining disk space falls below this ratio, the DataNode enters read-only mode. The default is 5%. Check it before scaling, migration, or large batch writes. |