
Docker Deployment
Docker Deployment
1. Environment Preparation
1.1 Install Docker
#Taking Ubuntu as an example. For other operating systems, you can search for installation methods on your own.
#step1: Install necessary system tools
sudo apt-get update
sudo apt-get -y install apt-transport-https ca-certificates curl software-properties-common
#step2: Install GPG certificate
curl -fsSL https://mirrors.aliyun.com/docker-ce/linux/ubuntu/gpg | sudo apt-key add -
#step3: Add the software source
sudo add-apt-repository "deb [arch=amd64] https://mirrors.aliyun.com/docker-ce/linux/ubuntu $(lsb_release -cs) stable"
#step4: Update and install Docker CE
sudo apt-get -y update
sudo apt-get -y install docker-ce
#step5: Set Docker to start automatically on boot
sudo systemctl enable docker
#step6: Verify if Docker is installed successfully
docker --version  #Display version information, indicating successful installation.
1.2 Install Docker Compose
#Installation command
curl -L "https://github.com/docker/compose/releases/download/v2.20.0/docker-compose-$(uname -s)-$(uname -m)" -o /usr/local/bin/docker-compose
chmod +x /usr/local/bin/docker-compose
ln -s  /usr/local/bin/docker-compose  /usr/bin/docker-compose
#Verify the installation
docker-compose --version  #Display version information, indicating successful installation.
1.3 Install dmidecode
By default, Linux servers should already have dmidecode. If not, you can use the following command to install it.
sudo apt-get install dmidecodeAfter installing dmidecode, you can locate its installation path by running:whereis dmidecode. Assuming the result is /usr/sbin/dmidecode, please remember this path as it will be used in the YML file of Docker Compose later.
1.4 Obtain the Container Image
For the TimechoDB container image, you can contact the Timecho team to acquire it.
2. Stand-Alone Deployment
This section demonstrates how to deploy a standalone Docker version of 1C1D.
2.1 Load the Image File
For example, if the TimechoDB container image file you obtained is named: timechodb-2.0.x.x-standalone-docker.tar.gz, use the following command to load the image:
docker load -i timechodb-2.0.x.x-standalone-docker.tar.gzTo view the loaded image, use the following command:
docker images
2.2 Create a Docker Bridge Network
docker network create --driver=bridge --subnet=172.18.0.0/16 --gateway=172.18.0.1 iotdb2.3 Write the Docker-Compose YML File
Assume the IoTDB installation directory and the YML file are placed under the /docker-iotdb folder. The directory structure is as follows:docker-iotdb/iotdb, /docker-iotdb/docker-compose-standalone.yml
docker-iotdb:
├── iotdb  #Iotdb installation directory
│── docker-compose-standalone.yml #YML file for standalone Docker Composer
The complete content of docker-compose-standalone.yml is as follows:
version: "3"
services:
  iotdb-service:
    image: timecho/timechodb:2.0.2.1-standalone #The image used
    hostname: iotdb
    container_name: iotdb
    restart: always
    ports:
      - "6667:6667"
    environment:
      - cn_internal_address=iotdb
      - cn_internal_port=10710
      - cn_consensus_port=10720
      - cn_seed_config_node=iotdb:10710
      - dn_rpc_address=iotdb
      - dn_internal_address=iotdb
      - dn_rpc_port=6667
      - dn_internal_port=10730
      - dn_mpp_data_exchange_port=10740
      - dn_schema_region_consensus_port=10750
      - dn_data_region_consensus_port=10760
      - dn_seed_config_node=iotdb:10710
    privileged: true
    volumes:
        - ./iotdb/activation:/iotdb/activation
        - ./iotdb/data:/iotdb/data
        - ./iotdb/logs:/iotdb/logs
        - /usr/sbin/dmidecode:/usr/sbin/dmidecode:ro
        - /dev/mem:/dev/mem:ro
    networks:
      iotdb:
        ipv4_address: 172.18.0.6
    # Note: Some environments set an extremely high container nofile limit (~2^30 = 1073741824).
    # This can make the startup step "Checking whether the ports are already occupied..." appear to hang (lsof slow).
    # If you see that line for a long time, lower the nofile limit by uncommenting below:
    # ulimits:
    #   nofile:
    #     soft: 1048576
    #     hard: 1048576
networks:
  iotdb:
    external: true
2.4 First Startup
Use the following command to start:
cd /docker-iotdb
docker-compose -f docker-compose-standalone.yml up
Since the system is not activated yet, it will exit immediately after the first startup, which is normal. The purpose of the first startup is to generate the machine code file for the activation process.

2.5 Apply for Activation
After the first startup, a
system_infofile will be generated in the physical machine directory/docker-iotdb/iotdb/activation. Copy this file and send it to the Timecho team.
Once you receive the
licensefile, copy it to the/docker-iotdb/iotdb/activationfolder.
2.6 Start IoTDB Again
docker-compose -f docker-compose-standalone.yml up -d
2.7 Verify the Deployment
Check the logs: If you see the following message, the startup is successful.
docker logs -f iotdb-datanode #View log command
2024-07-19 12:02:32,608 [main] INFO  o.a.i.db.service.DataNode:231 - Congratulations, IoTDB DataNode is set up successfully. Now, enjoy yourself!
Enter the container and check the service status:
View the launched container
docker ps
Enter the container, log in to the database through CLI, and use the show cluster command to view the service status and activation status
docker exec -it iotdb  /bin/bash         #Enter the container
./start-cli.sh -h iotdb                  #Log in to the database
IoTDB> show cluster                      #Check the service status
If all services are in the
runningstate, the IoTDB deployment is successful.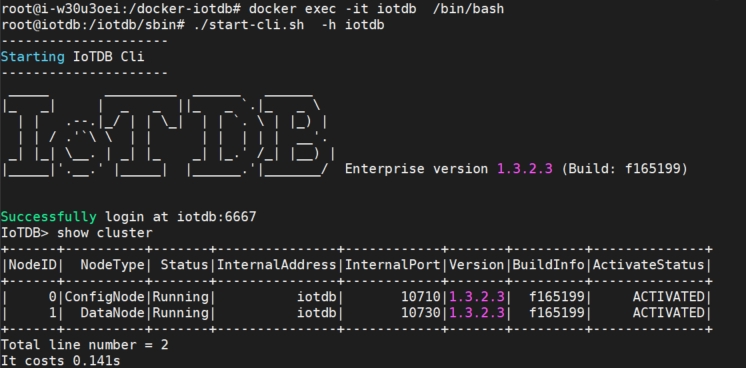
2.8 Map the /conf Directory (Optional)
If you want to modify configuration files directly on the physical machine, you can map the /conf folder from the container. Follow these steps:
Step 1: Copy the /conf directory from the container to /docker-iotdb/iotdb/conf:
docker cp iotdb:/iotdb/conf /docker-iotdb/iotdb/confStep 2: Add the mapping in docker-compose-standalone.yml:
    volumes:
        - ./iotdb/conf:/iotdb/conf   # Add this mapping for the /conf folder
        - ./iotdb/data:/iotdb/data
        - ./iotdb/logs:/iotdb/logs
        - /dev/mem:/dev/mem:ro
Step 3: Restart IoTDB:
docker-compose -f docker-compose-standalone.yml up -d3. Cluster Deployment
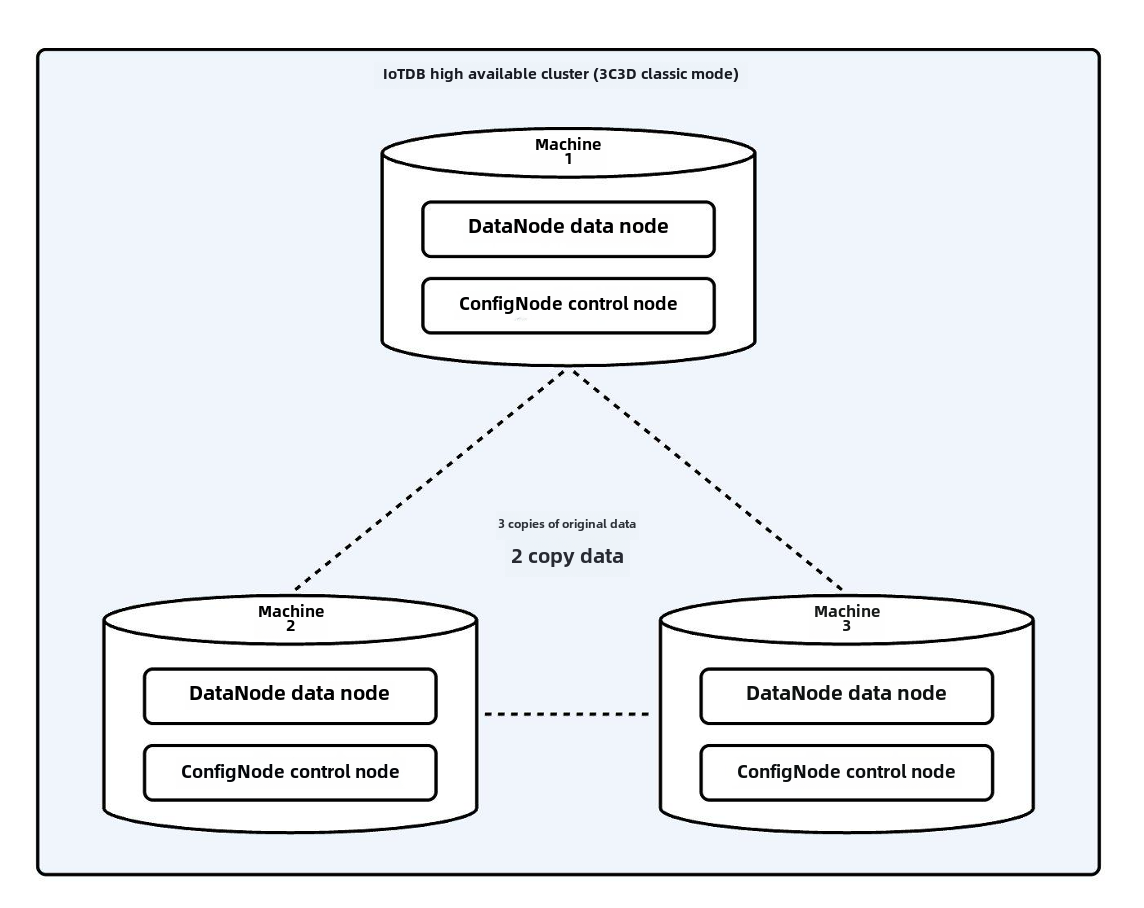
This section describes how to manually deploy a cluster consisting of 3 ConfigNodes and 3 DataNodes, commonly referred to as a 3C3D cluster.
Note: The cluster version currently only supports host and overlay networks, and does not support bridge networks.
Below, we demonstrate how to deploy a 3C3D cluster using the host network as an example.
3.1 Set Hostnames
Assume there are 3 Linux servers with the following IP addresses and service roles:
| Node IP | Hostname | Services |
|---|---|---|
| 192.168.1.3 | iotdb-1 | ConfigNode, DataNode |
| 192.168.1.4 | iotdb-2 | ConfigNode, DataNode |
| 192.168.1.5 | iotdb-3 | ConfigNode, DataNode |
On each of the 3 machines, configure the hostnames by editing the /etc/hosts file. Use the following commands:
echo "192.168.1.3  iotdb-1"  >> /etc/hosts
echo "192.168.1.4  iotdb-2"  >> /etc/hosts
echo "192.168.1.5  iotdb-3"  >> /etc/hosts
3.2 Load the Image File
For example, if the TimechoDB container image file is named timechodb-2.0.x.x.3-standalone-docker.tar.gz, execute the following command on all 3 servers to load the image:
docker load -i timechodb-2.0.x.x-standalone-docker.tar.gzTo view the loaded images, run:
docker images
3.3. Write the Docker-Compose YML Files
Here, we assume the IoTDB installation directory and YML files are placed under the /docker-iotdb folder. The directory structure is as follows:
docker-iotdb:
├── confignode.yml #ConfigNode YML file
├── datanode.yml   #DataNode YML file
└── iotdb          #IoTDB installation directory
On each server, create two YML files: confignode.yml and datanode.yml. Examples are provided below:
confignode.yml:
#confignode.yml
version: "3"
services:
  iotdb-confignode:
    image: timechodb:2.0.x.x-standalone #The image used
    hostname: iotdb-1|iotdb-2|iotdb-3 #Choose from three options based on the actual situation
    container_name: iotdb-confignode
    command: ["bash", "-c", "entrypoint.sh confignode"]
    restart: always
    environment:
      - cn_internal_address=iotdb-1|iotdb-2|iotdb-3 #Choose from three options based on the actual situation
      - cn_internal_port=10710
      - cn_consensus_port=10720
      - cn_seed_config_node=iotdb-1:10710   #The default first node is the seed node
      - schema_replication_factor=3         #Number of metadata copies
      - data_replication_factor=2           #Number of data replicas
    privileged: true
    volumes:
      - ./iotdb/activation:/iotdb/activation
      - ./iotdb/data:/iotdb/data
      - ./iotdb/logs:/iotdb/logs
      - /usr/sbin/dmidecode:/usr/sbin/dmidecode:ro
      - /dev/mem:/dev/mem:ro
    network_mode: "host"    #Using the host network
    # Note: Some environments set an extremely high container nofile limit (~2^30 = 1073741824).
    # This can make the startup step "Checking whether the ports are already occupied..." appear to hang (lsof slow).
    # If you see that line for a long time, lower the nofile limit by uncommenting below:
    # ulimits:
    #   nofile:
    #     soft: 1048576
    #     hard: 1048576
datanode.yml:
#datanode.yml
version: "3"
services:
  iotdb-datanode:
    image: timechodb:2.0.x.x-standalone #The image used
    hostname: iotdb-1|iotdb-2|iotdb-3 #Choose from three options based on the actual situation
    container_name: iotdb-datanode
    command: ["bash", "-c", "entrypoint.sh datanode"]
    restart: always
    ports:
      - "6667:6667"
    privileged: true
    environment:
      - dn_rpc_address=iotdb-1|iotdb-2|iotdb-3 #Choose from three options based on the actual situation
      - dn_internal_address=iotdb-1|iotdb-2|iotdb-3 #Choose from three options based on the actual situation
      - dn_seed_config_node=iotdb-1:10710      #The default first node is the seed node
      - dn_rpc_port=6667
      - dn_internal_port=10730
      - dn_mpp_data_exchange_port=10740
      - dn_schema_region_consensus_port=10750
      - dn_data_region_consensus_port=10760
      - schema_replication_factor=3         #Number of metadata copies
      - data_replication_factor=2           #Number of data replicas
    volumes:
      - ./iotdb/activation:/iotdb/activation
      - ./iotdb/data:/iotdb/data
      - ./iotdb/logs:/iotdb/logs
      - /usr/sbin/dmidecode:/usr/sbin/dmidecode:ro
      - /dev/mem:/dev/mem:ro
    network_mode: "host"   #Using the host network
    # Note: Some environments set an extremely high container nofile limit (~2^30 = 1073741824).
    # This can make the startup step "Checking whether the ports are already occupied..." appear to hang (lsof slow).
    # If you see that line for a long time, lower the nofile limit by uncommenting below:
    # ulimits:
    #   nofile:
    #     soft: 1048576
    #     hard: 1048576
3.4 Start ConfigNode for the First Time
Start the ConfigNode on all 3 servers. Note the startup order: Start iotdb-1 first, followed by iotdb-2 and iotdb-3.
Run the following command on each server:
cd /docker-iotdb
docker-compose -f confignode.yml up  -d #Background startup
3.5 Apply for Activation
After starting the 3 ConfigNodes for the first time, a
system_infofile will be generated in the/docker-iotdb/iotdb/activationdirectory on each physical machine. Copy thesystem_infofiles from all 3 servers and send them to the Timecho team.Place the 3
licensefiles into the corresponding/docker-iotdb/iotdb/activationfolders on each ConfigNode server.Once the
licensefiles are placed in theactivationfolders, the ConfigNodes will automatically activate. No restart is required for the ConfigNodes.
3.6 Start DataNode
Start the DataNode on all 3 servers:
cd /docker-iotdb
docker-compose  -f  datanode.yml  up -d #Background startup
3.7 Verify Deployment
Check the logs: If you see the following message, the DataNode has started successfully.
docker logs -f iotdb-datanode #View log command
2024-07-20 16:50:48,937 [main] INFO  o.a.i.db.service.DataNode:231 - Congratulations, IoTDB DataNode is set up successfully. Now, enjoy yourself!
Enter the container and check the service status:
View the launched container
docker ps
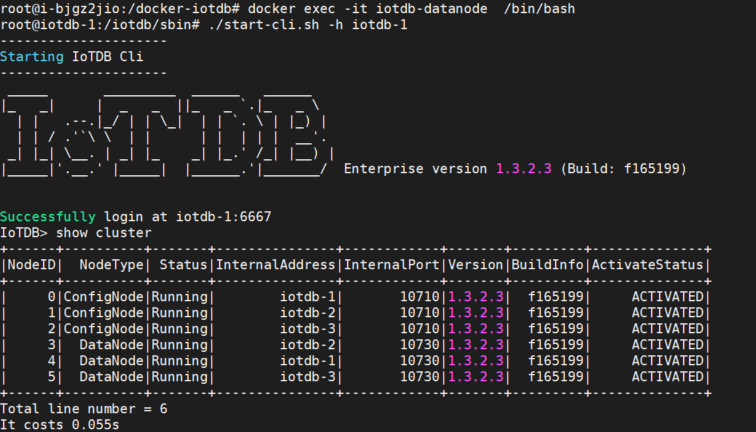
Enter any container, log in to the database via CLI, and use the
show clustercommand to check the service status:
docker exec -it iotdb-datanode /bin/bash #Entering the container
./start-cli.sh -h iotdb-1                #Log in to the database
IoTDB> show cluster                      #View status
If all services are in the running state, the IoTDB deployment is successful.
3.8 Map the /conf Directory (Optional)
If you want to modify configuration files directly on the physical machine, you can map the /conf folder from the container. Follow these steps:
Step 1: Copy the /conf directory from the container to /docker-iotdb/iotdb/conf on all 3 servers:
docker cp iotdb-confignode:/iotdb/conf /docker-iotdb/iotdb/conf
or
docker cp iotdb-datanode:/iotdb/conf   /docker-iotdb/iotdb/conf
Step 2: Add the /conf directory mapping in both confignode.yml and datanode.yml on all 3 servers:
#confignode.yml
    volumes:
      - ./iotdb/conf:/iotdb/conf  #Add mapping for this /conf folder
      - ./iotdb/activation:/iotdb/activation
      - ./iotdb/data:/iotdb/data
      - ./iotdb/logs:/iotdb/logs
      - /usr/sbin/dmidecode:/usr/sbin/dmidecode:ro
      - /dev/mem:/dev/mem:ro

#datanode.yml
    volumes:
      - ./iotdb/conf:/iotdb/conf   #Add mapping for this /conf folder
      - ./iotdb/activation:/iotdb/activation
      - ./iotdb/data:/iotdb/data
      - ./iotdb/logs:/iotdb/logs
      - /usr/sbin/dmidecode:/usr/sbin/dmidecode:ro
      - /dev/mem:/dev/mem:ro
Step 3: Restart IoTDB on all 3 servers:
cd /docker-iotdb
docker-compose  -f confignode.yml  up  -d
docker-compose  -f datanode.yml    up  -d